How to use trading features on OKX
Instructions for spot trading
Step 1: Example with BTC/USDT spot trading. First, go to Trading, then click on Spot under Basic Trading.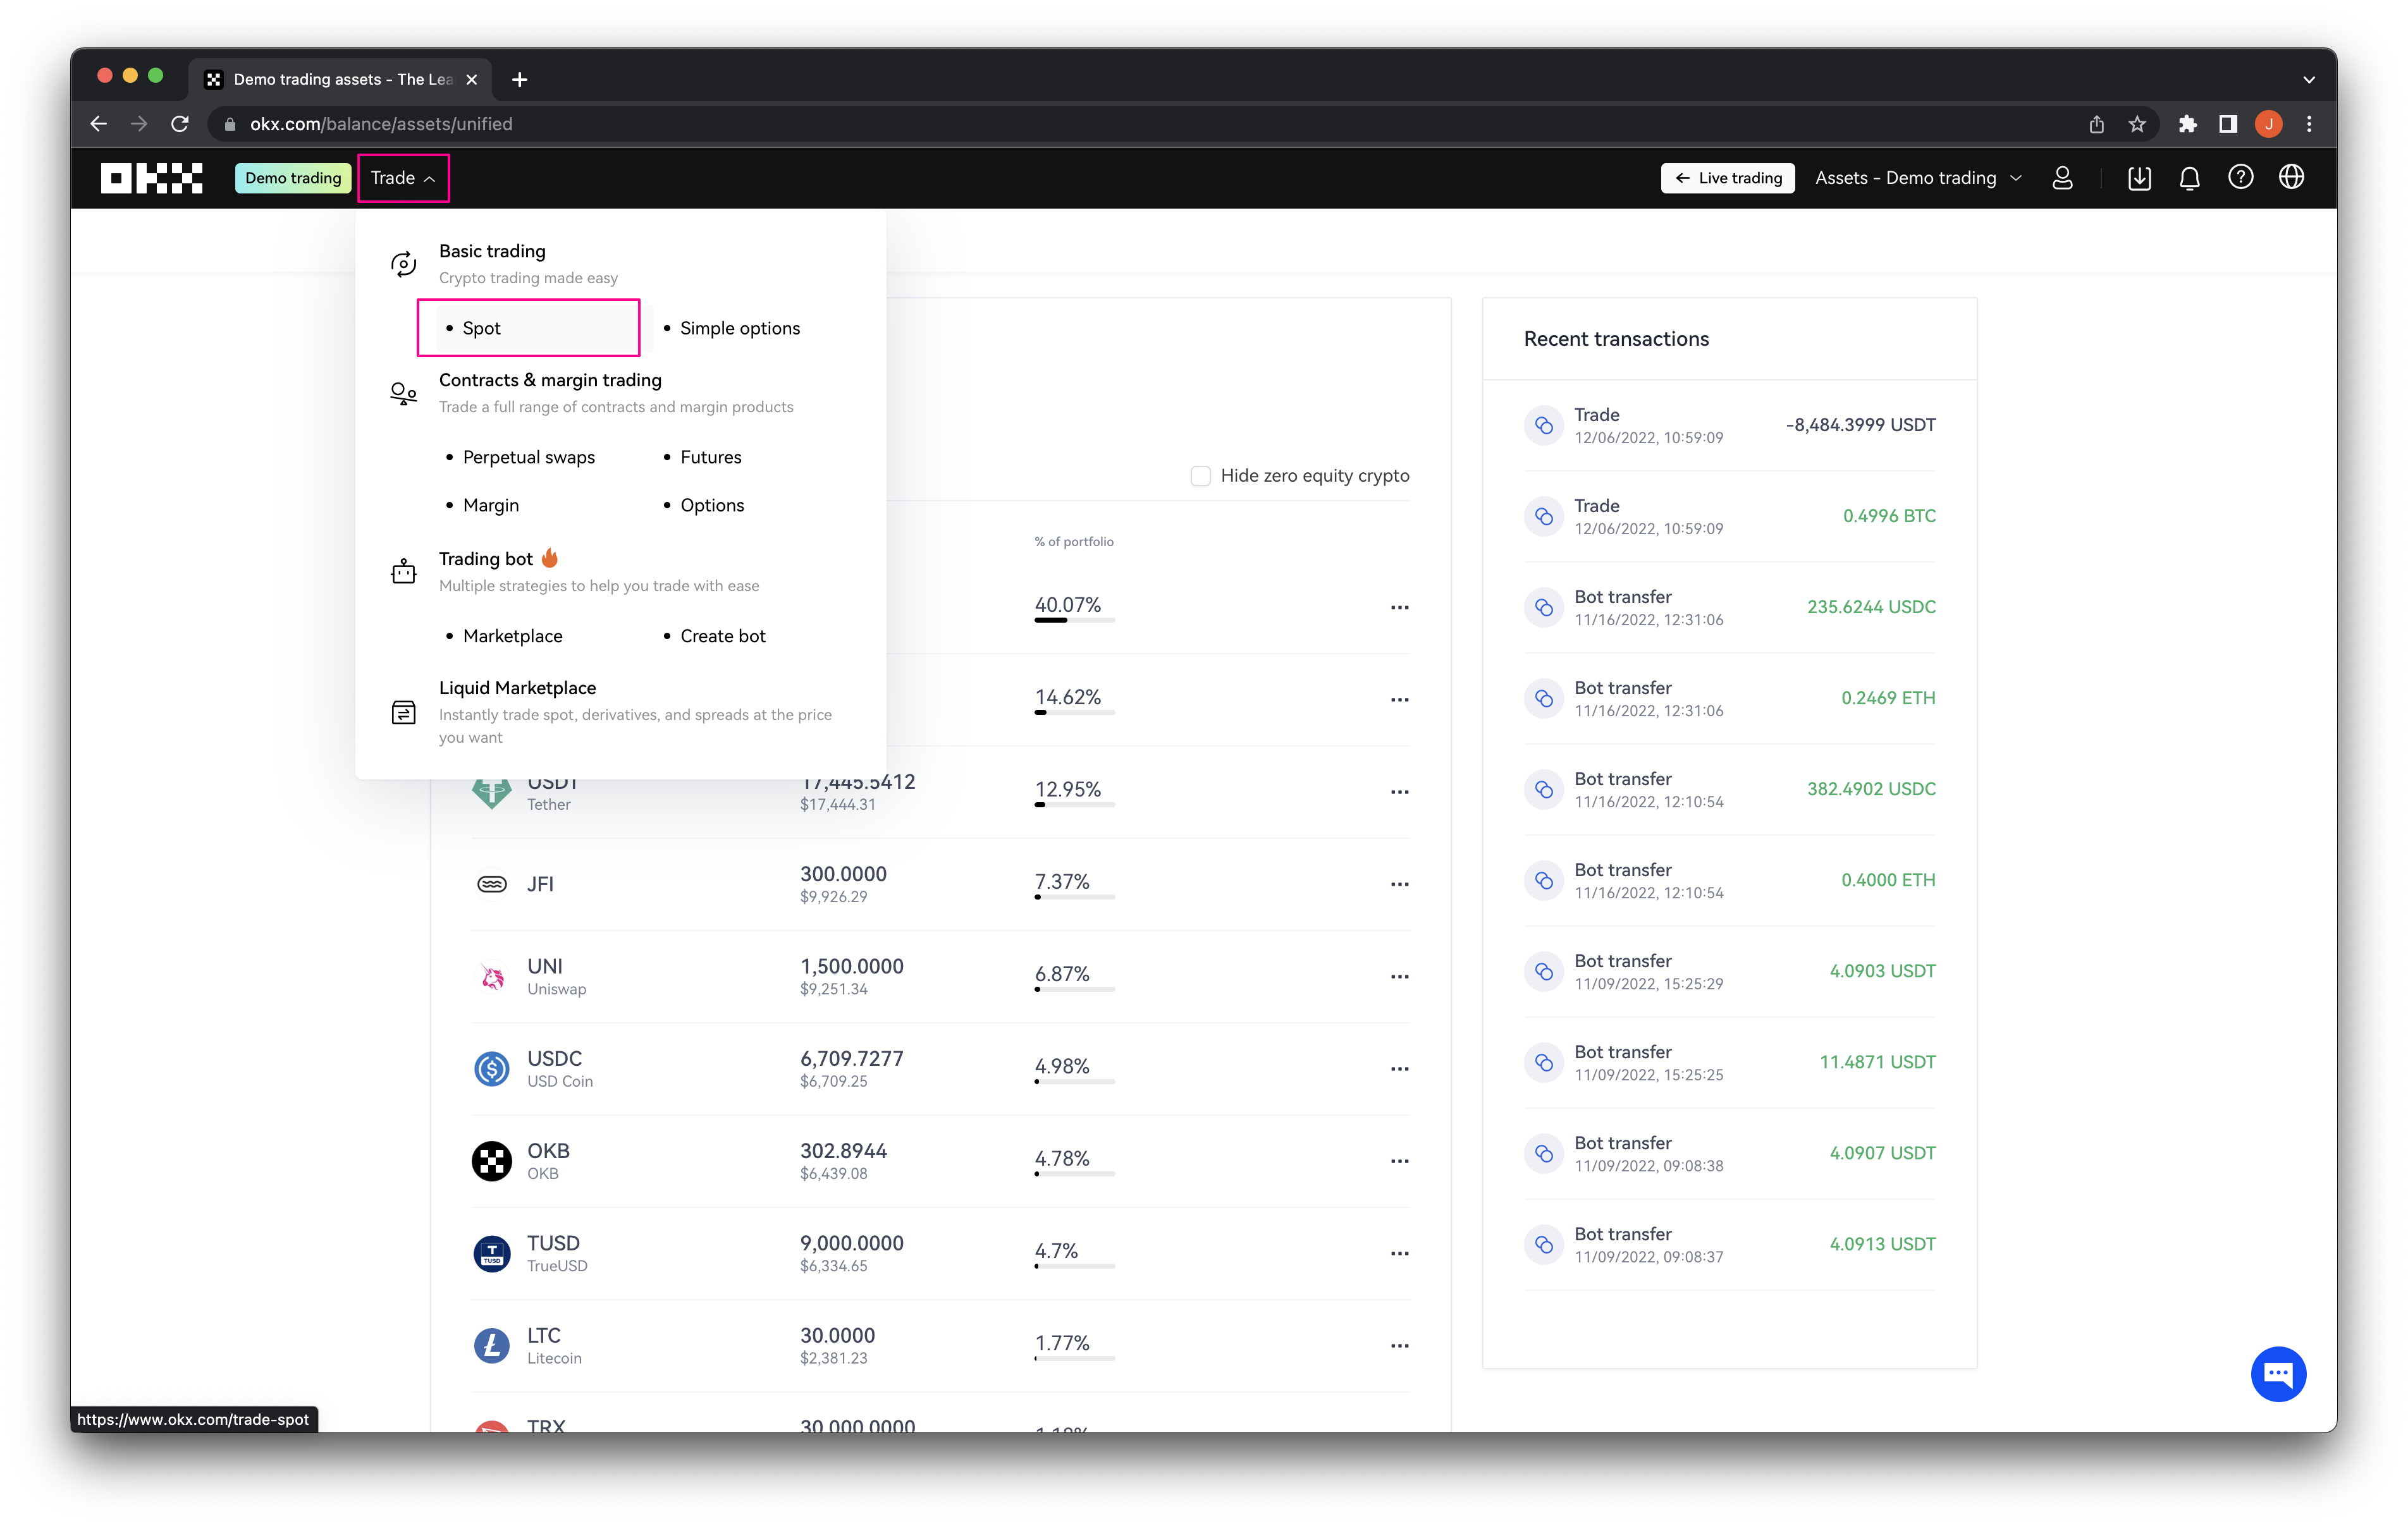 Step 2: Next, select your market and trading pair from the menu at the top of the Basic Trading page.
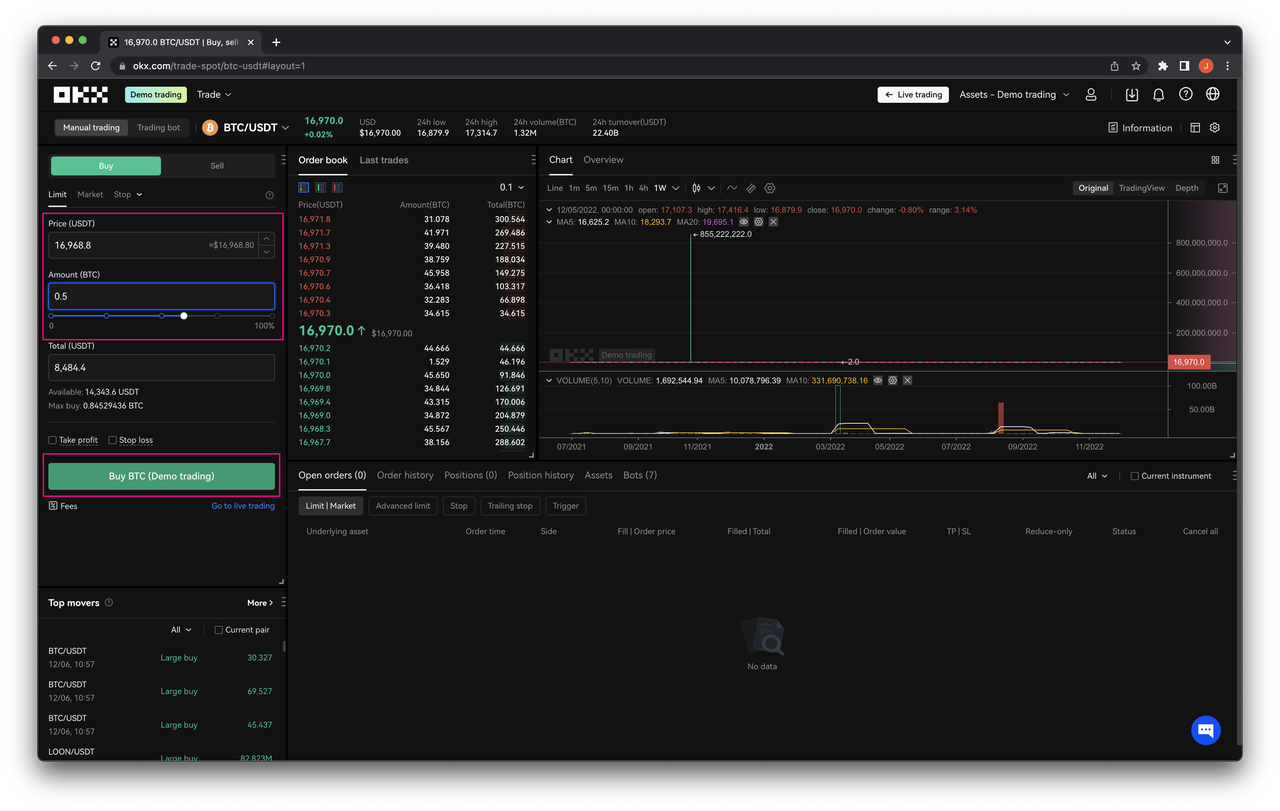
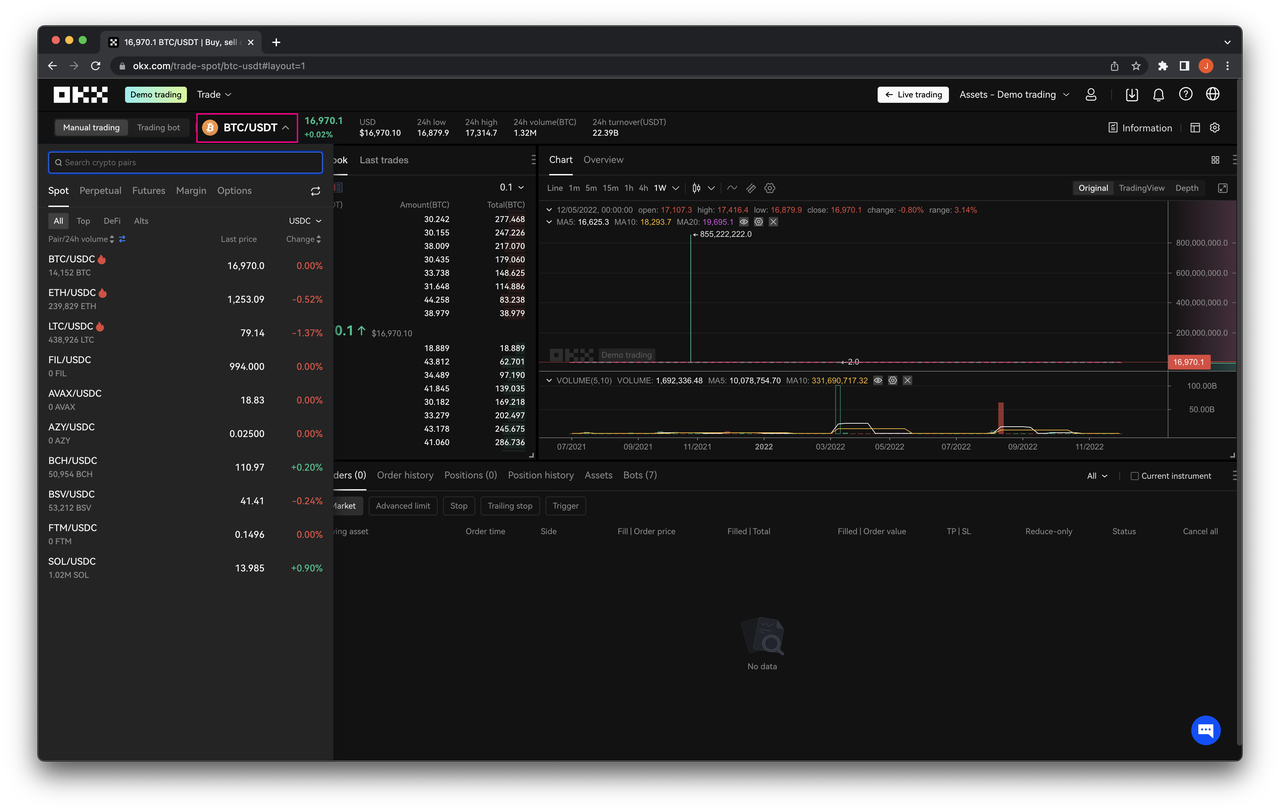 Step 3: Select the order type, enter the BTC price in USDT (if available) and the amount of BTC you want to buy, then click Buy BTC .
The ultimate guide to P2P trading: How to convert crypto to fiat
The OKX P2P Marketplace enables you to exchange crypto peer-to-peer (P2P) with other users, using your preferred local currency. Since you are exchanging directly with other users, it offers a wider range of payment methods than traditional exchange platforms.
Imagine you want to buy crypto. Here’s how the OKX P2P Marketplace works:
- OKX lock-in the crypto from your seller
- OKX release to your funding account the crypto you bought after your payment has been received by the seller
It really couldn’t be simpler. In this guide, we’ll cover:
- How to add a payment method to use on the P2P marketplace
- How to buy crypto P2P
- How to sell crypto P2P
- How to solve a dispute on our P2P marketplace
- How the cancellation rules work on OKX P2P
Start trading
Essential steps before using our P2P marketplace
To buy or sell crypto on OKX’s P2P Trading marketplace, you will first need to:
- Complete KYC identity verification (read our guide)
- Add at least one payment method to your account
- How to add a payment method
Step 1
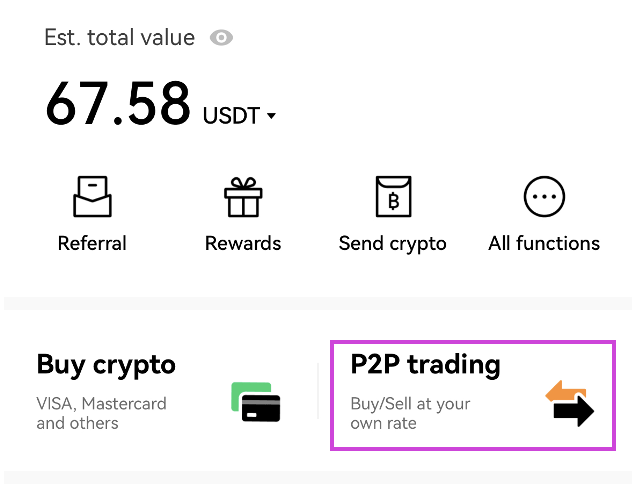
To add a payment method, tap P2P trading on the main page on the Pro mode of the app.
Can’t find ‘P2P trading’ on the app? You’ll need to switch to Pro mode. To make the switch, tap on your profile icon on the upper right-hand corner of the Home screen and select Pro mode.
Step 2
Click on More at the bottom right hand corner of the navigation toolbar.
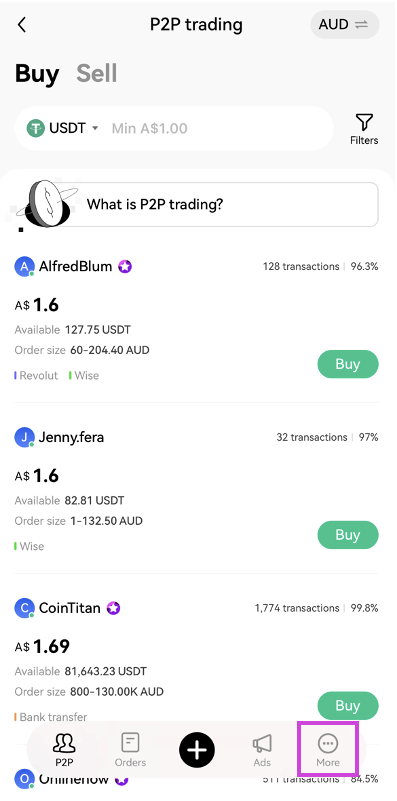
Step 3
Tap Payment from the list of options that pops up.
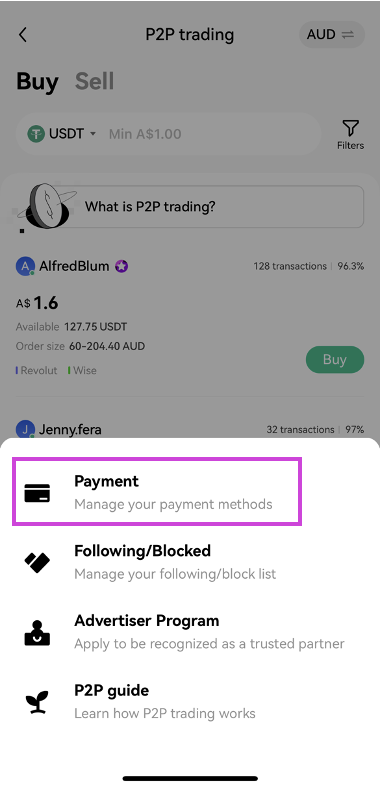
Step 4
Next, select the currency you want to use and tap Add Account to open the list of available payment methods.
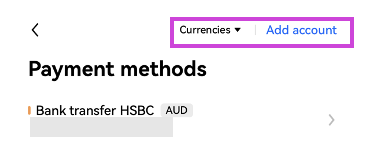
Step 5
Select the payment method you want to use from the list. OKX P2P Trading marketplace supports payments by bank transfer, wallets and virtual banks. You can find the list of supported payment methods here.
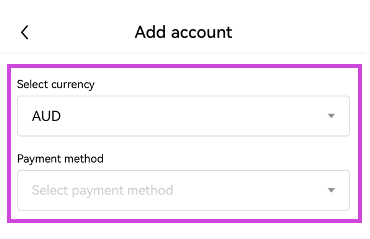
Step 6
The advertiser — another OKX user — chooses which payment methods they accept. This means that you can often buy or sell cryptocurrency using a wider choice of payment methods than traditional exchanges typically accept.
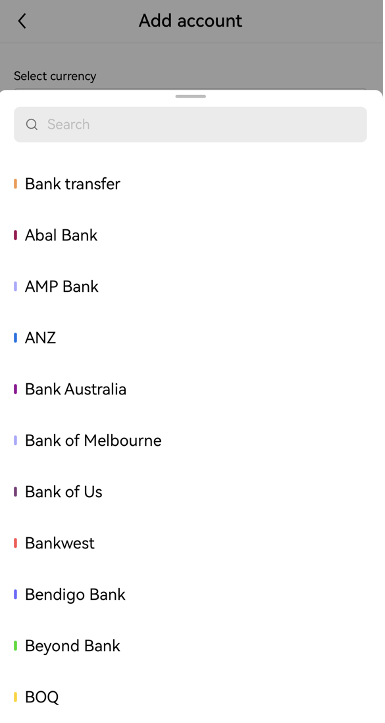
Step 7
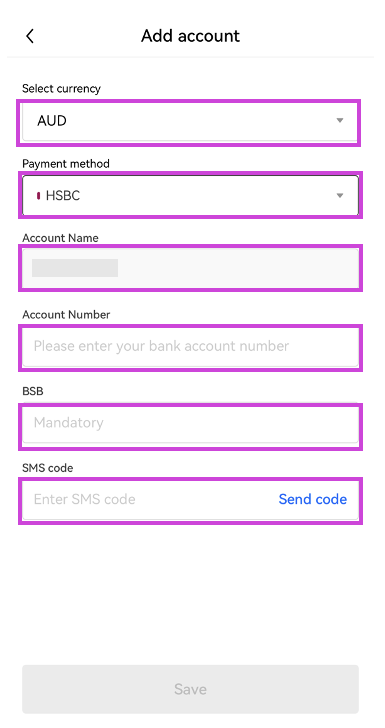
Enter the details requested and complete the 2-factor authentication check. Then, tap Save and you are done! Now that you have added a payment method, let’s learn how to buy crypto.
- How to buy crypto the OKX P2P marketplace
Step 1
Log in to your account on the OKX app and tap P2P trading.
Step 2
On the OKX P2P marketplace home screen, make sure that Buy is selected at the top-most navigation bar and select the payment currency used to make the purchase. Select the corresponding crypto you want to receive and filter the listed offers by payment method or amount available. Then, tap Buy next to your preferred offer.
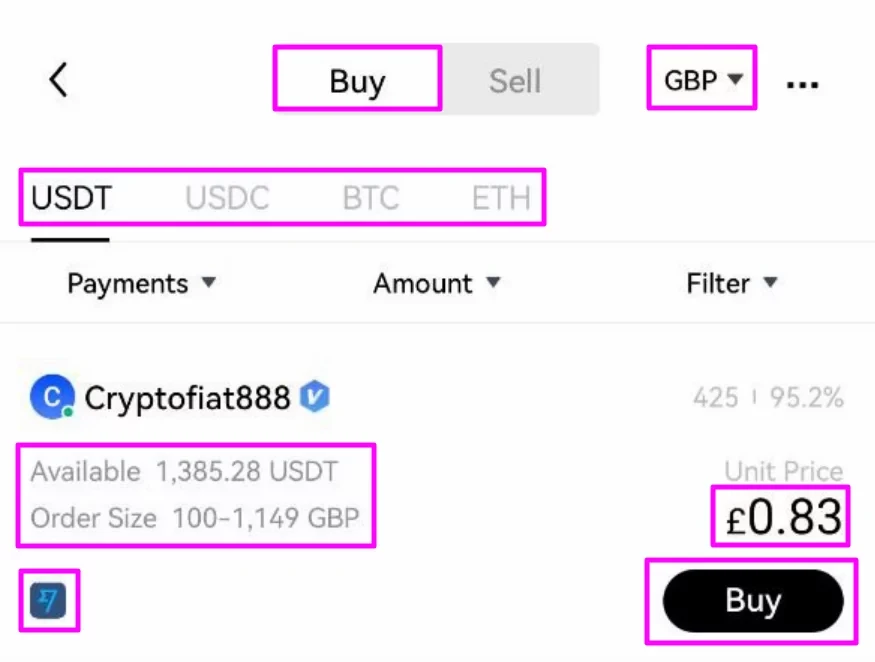
Step 3
Enter the quantity of crypto you want to buy and select your desired payment method. Then, tap Buy [crypto].
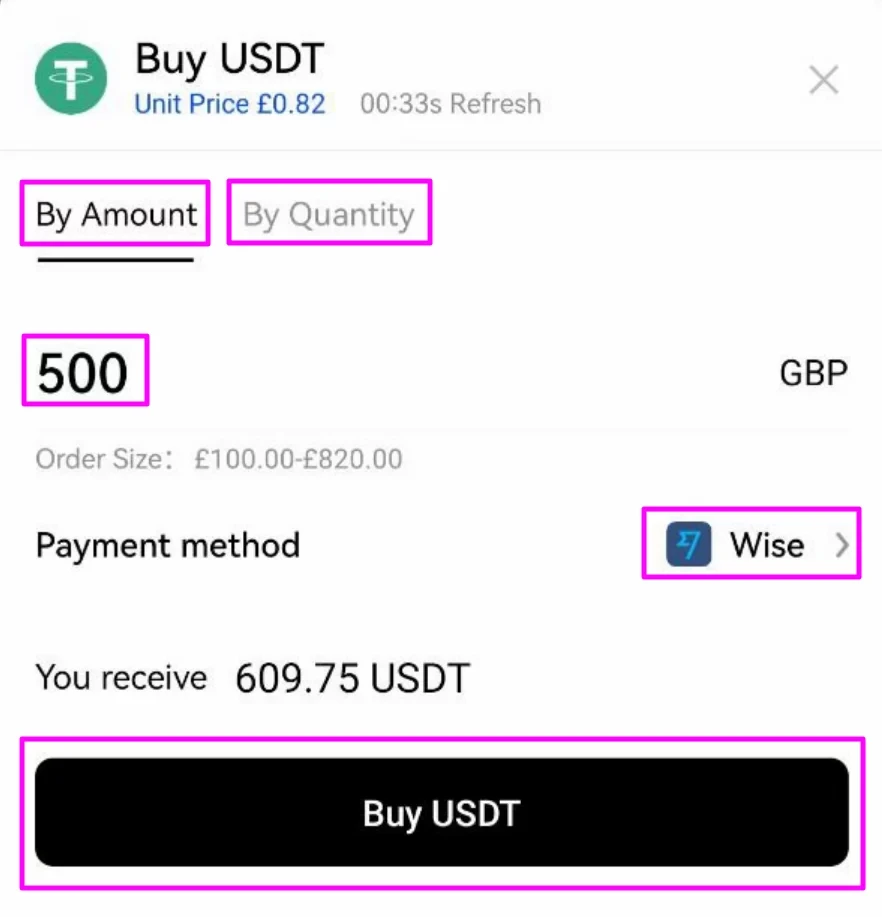
Step 4
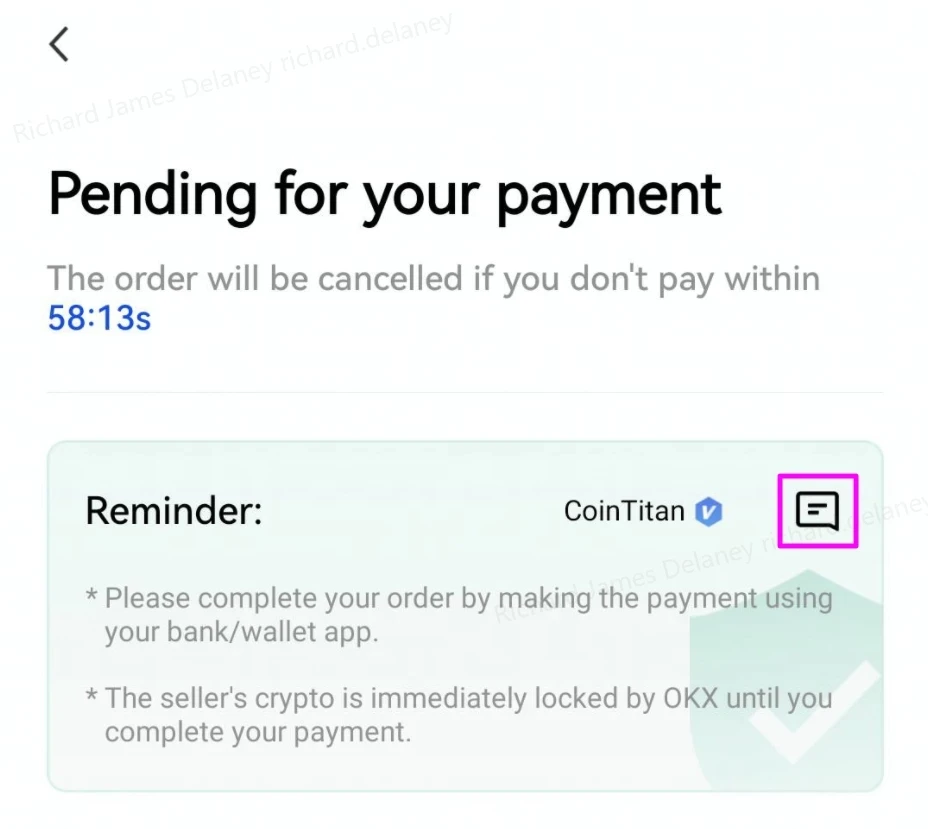
At this point, OKX will hold the crypto being bought until the seller confirms the payment has been received, the order has been canceled by you, or the order times out. You must not make the payment if the order is at risk of timing out because OKX will automatically release the crypto held when the timer reaches zero or if the payment has not been marked as completed.
If you need to message the seller for any reason, tap the highlighted icon.
If not, check the order details and tap Continue.
Step 5
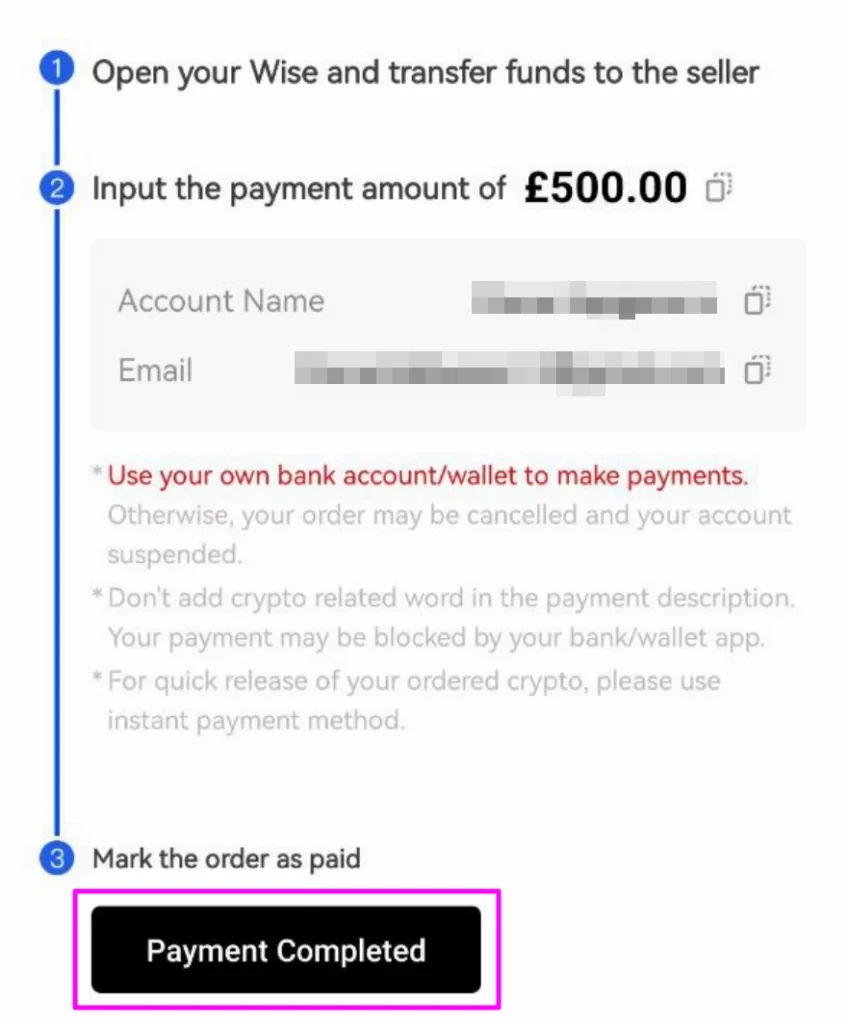
The next screen will show you the seller’s payment details. Make the required payment using the agreed method. Then, double-check all the details. Tap Payment Completed when you have made the payment.
Step 6
When the seller confirms receipt of payment, the crypto held by OKX will be released to your funding account. Now that you know how to buy crypto, let’s learn how to sell it.
- How to sell crypto on the OKX P2P marketplace
Step 1
Log in to your account on the OKX app and tap P2P trading.
Step 2
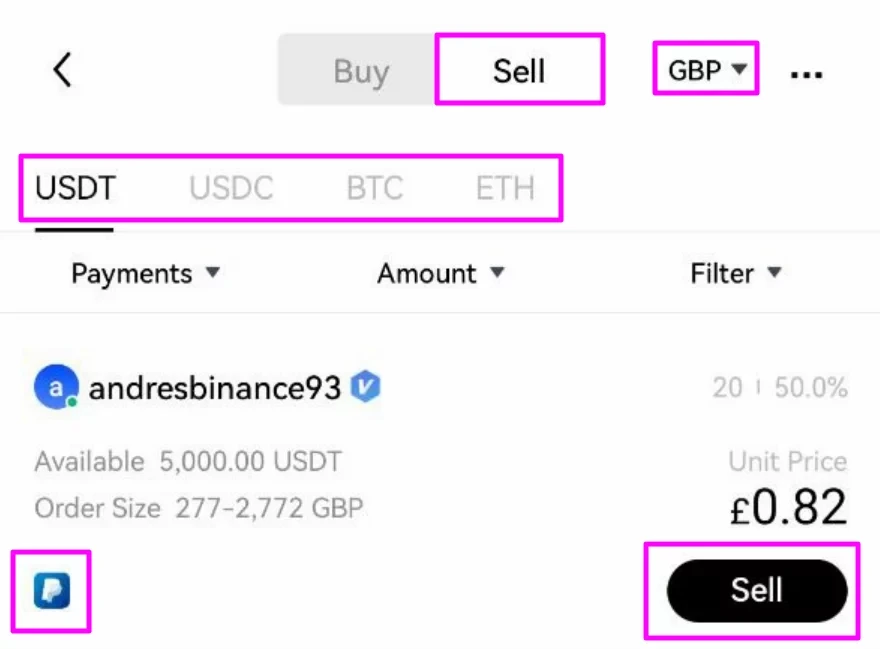
On the OKX P2P marketplace home screen, make sure that Sell is selected at the top-most navigation bar and select the currency that you want to receive payment in. Select the corresponding crypto you want to sell and filter the listed offers by payment method or amount available. Then, tap Sell next to your preferred offer.
Step 3
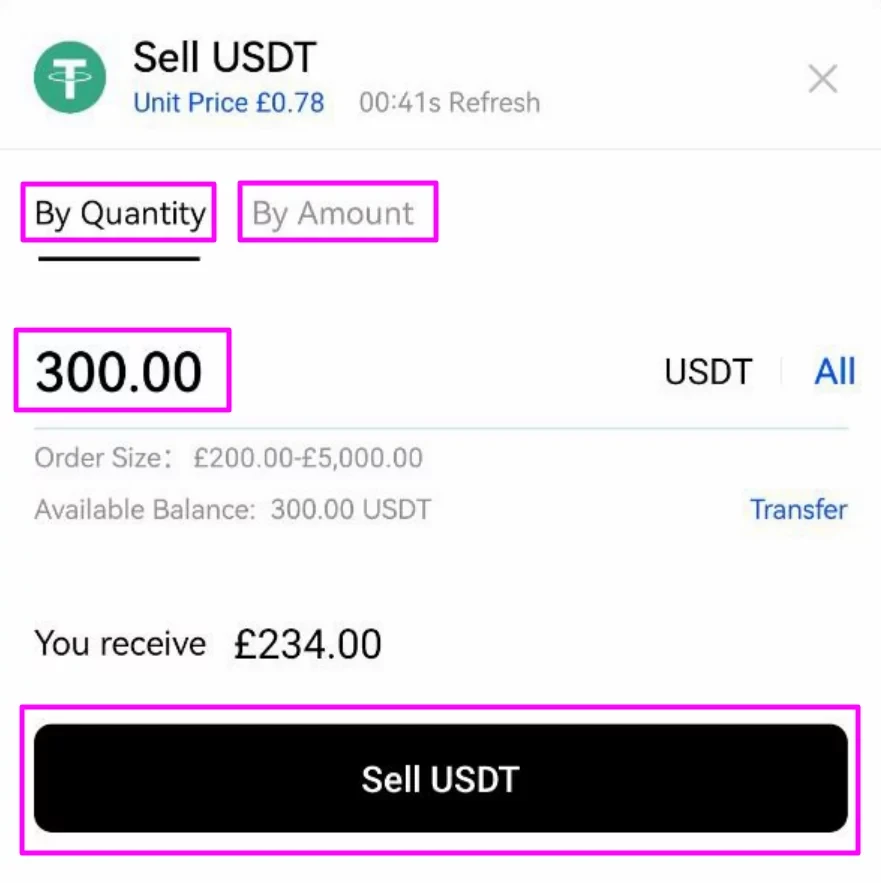
On the sell order popup, enter the quantity of the crypto you want to sell for local currency or the amount you want to receive. Check the details entered and tap Sell [crypto].
Step 4
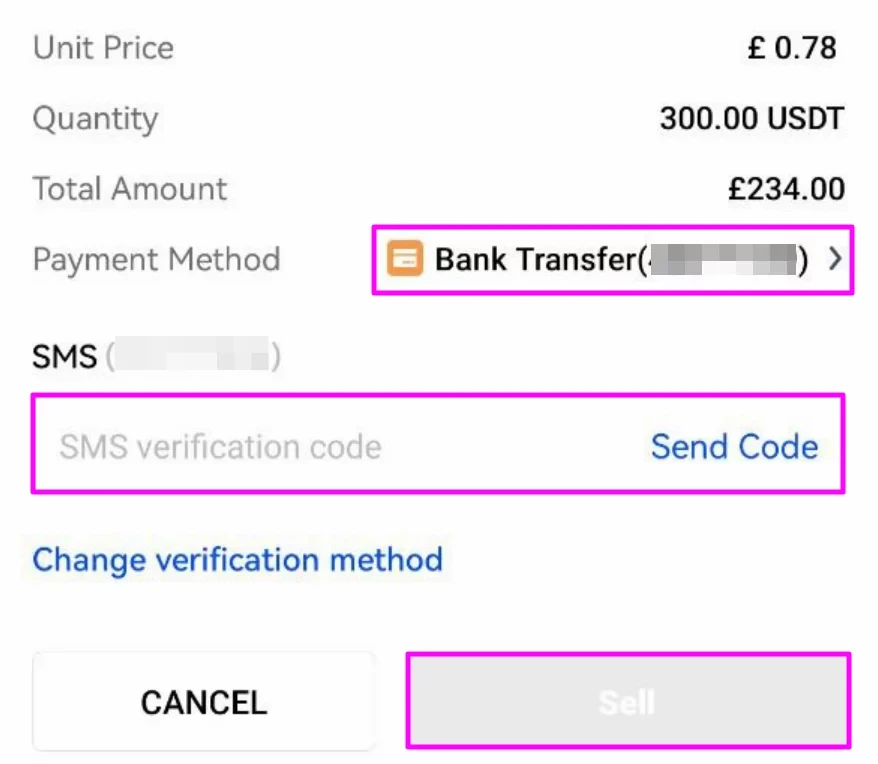
Select the payment method to receive funds on the next screen. Then, check your P2P trade details and and complete the 2-factor authentication check. Tap Sell to complete your sale.
Step 5
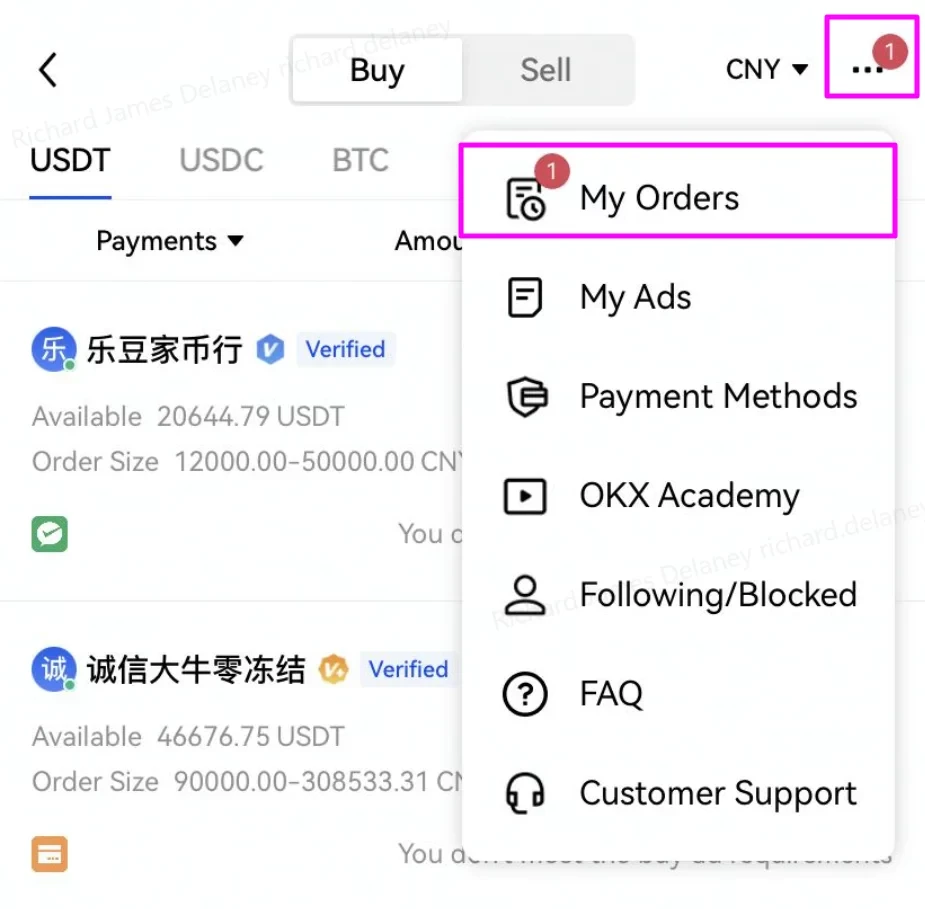
With the sell order placed, you must wait for the buyer to make a payment to your bank or wallet account. When they have completed their payment, you will receive a notification under My Orders.
Step 6
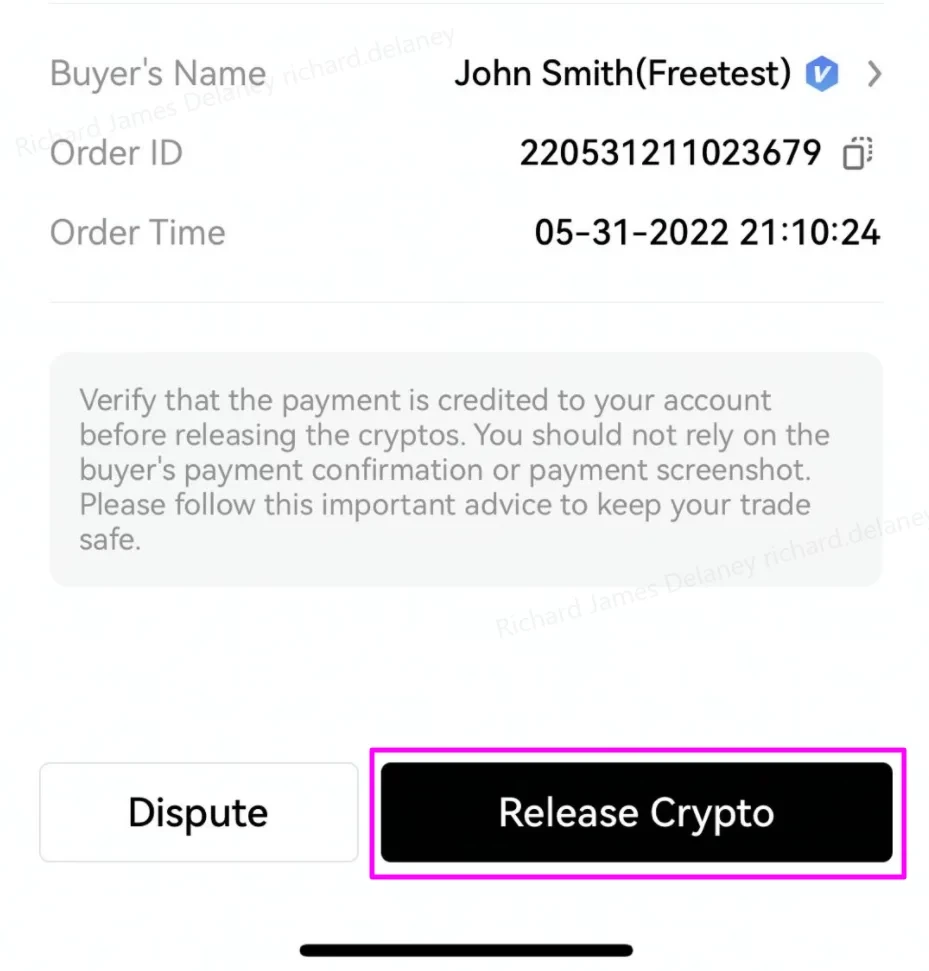
Check your bank account or the appropriate payment method when you receive the notification confirming the payment is complete. If you have received the payment, tap the order from the Pending section and tap Release Crypto on the next screen.
Note: Do not tap Release Crypto until you have received the payment and confirmed it for yourself — you should not rely on the buyer showing you a screenshot of the completed payment or any other reason.
Step 7
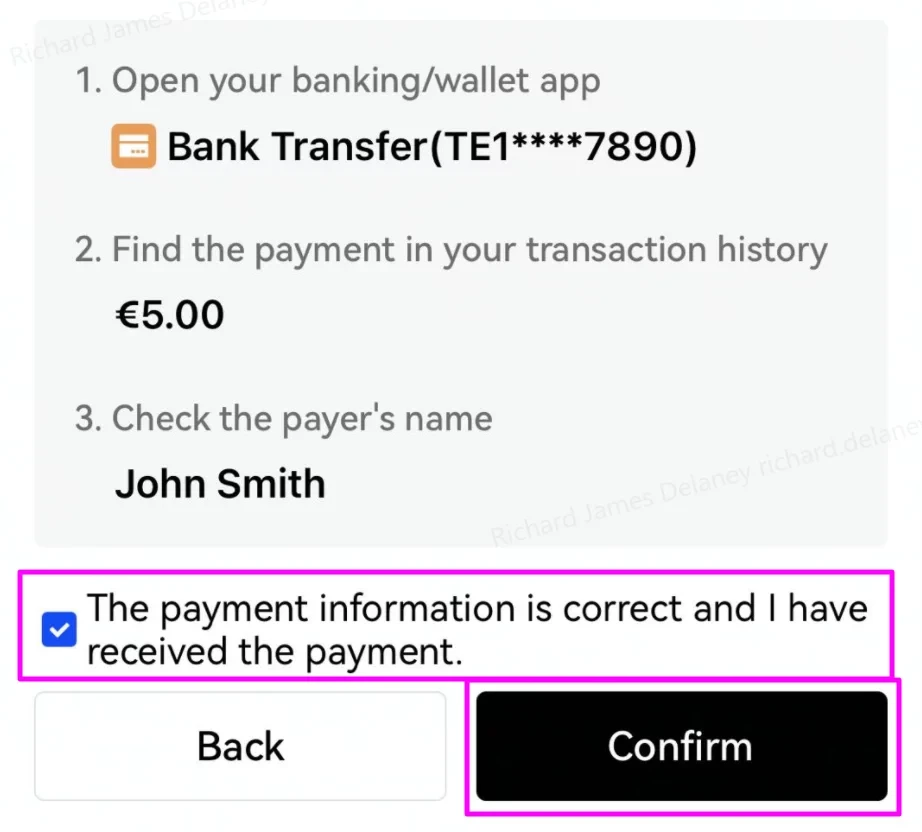
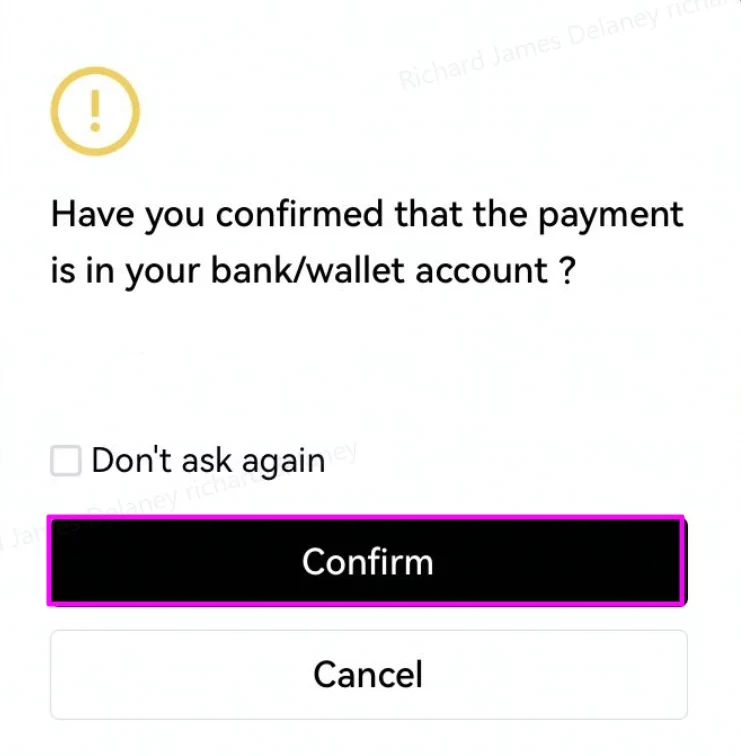
Carefully check that the details from the payment received match those shown on the screen. When you’re happy that the funds are in your account, check the box and tap Confirm.
Step 8
On the following screen, tap Confirm.
Step 9
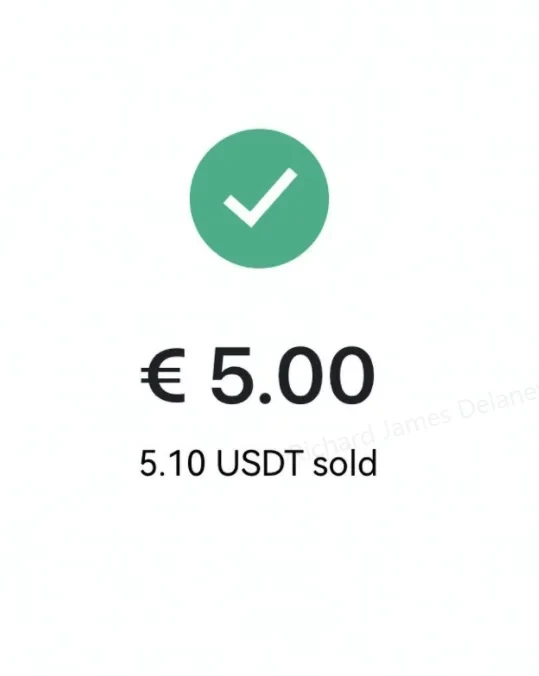
You’ll then receive a confirmation of your completed P2P order and you are done! Now that you have learnt how to sell crypto, let’s also see how you can raise a dispute or cancel an order if required.
- How to solve a dispute on the OKX P2P marketplace
When buying crypto via P2P trading, you can raise a dispute if you’ve made a payment but the seller did not release the crypto. Before doing so, OKX recommend you to:
- Give some time for the seller to release the tokens
- Communicate with them. There are sometimes bank transfer delays, especially if you’ve used a non-instantaneous payment method.
In the meantime, OKX will also automatically send an email to the seller, reminding them to release the crypto.
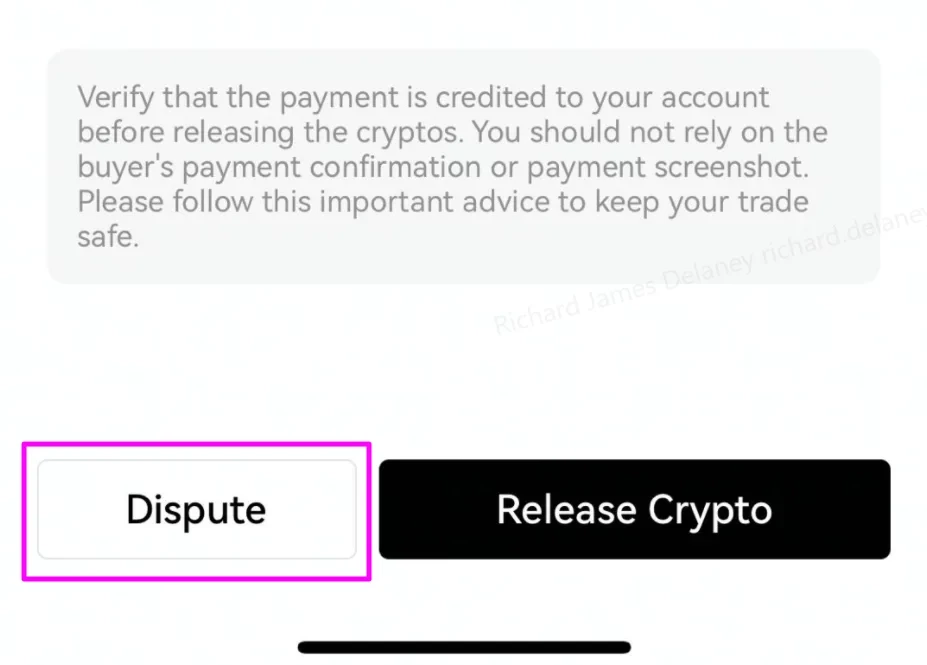
If the issue persists, you can raise a dispute by:
- Locating your relevant order in the My Orders section
- Tapping the Dispute button
Once a dispute has been raised, their Customer Support team will act as a mediator between you and the seller and will follow up accordingly with the respective parties.
- P2P marketplace cancelation rules
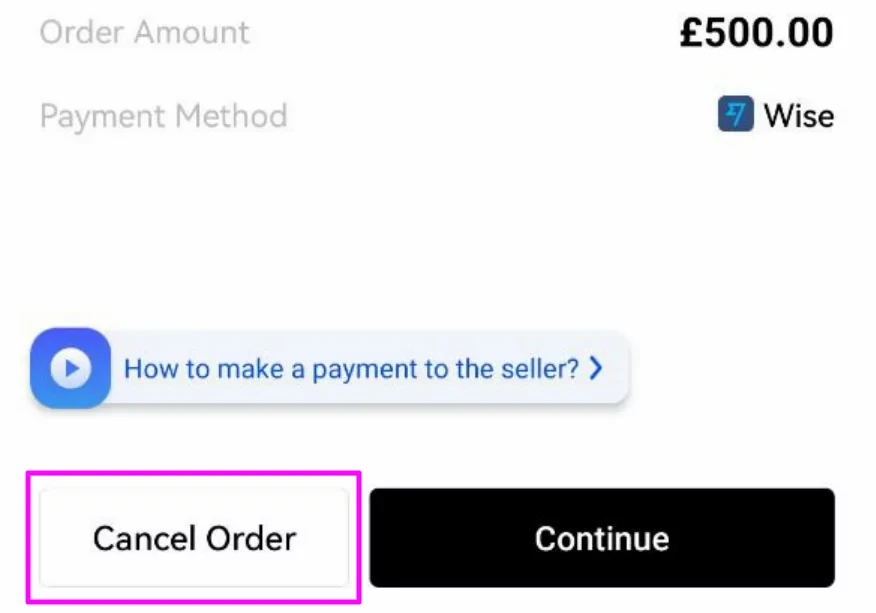
If you’re buying crypto with local currency on our P2P Trading marketplace, you can cancel the trade at any time. This releases the assets held by OKX back to the seller. Your order will be canceled if you don’t make the payment on time. You mustn’t attempt to send payment close to expiry because the funds are returned to the seller automatically if the time runs out before you mark the payment as completed. It’s safer to cancel the order and start again. To cancel an order, locate your relevant order in the My Orders section and tap Cancel.
When buying on the P2P marketplace, OKX recommend you never cancel an order that has been paid. Instead, you should reach out to the seller to come to an agreement on the refund before cancelling.
How to trade cryptocurrency on margin on OKX
Trading cryptocurrencies on OKX is designed to be intuitive and straightforward for both beginners and veteran traders. OKX provide the most sophisticated trading features for experienced users to facilitate advanced trading strategies. One such feature is margin trading, and this tutorial will help you get started with it.
Margin, in traditional finance, is money used as collateral to secure a loan used to take a larger position in an asset. The difference between the total value of an investment and the borrowed amount is called the margin. In the case of cryptocurrencies, margin trading refers to the use of borrowed funds — usually from an exchange like OKX — to trade crypto. Traders leverage their margin in multiples to amplify potential gains or losses.
For instance, if a trader has 0.2 BTC, 5x leverage means that they can borrow an extra 0.8 BTC and enter a long or short position with 1 BTC. If the trader closes the position for a 20% return, they will gain 0.2 BTC (1.2 BTC – 1 BTC). Without leverage, the same trade’s profit would only be 0.04 BTC (20% of 0.2 BTC).
However, the same applies to losses, too. If the trader closed the 5x leveraged position (1 BTC) for a 20% loss, they lose 0.2 BTC — compared to 0.04 BTC loss without leverage.
The use of leverage serves to amplify both risks and rewards, and does not alter any of the conditions associated with a derivative, such as a futures or options contract.
You can start trading cryptocurrency on margin at OKX using the step-by-step guidelines below. You should find the instructions applicable to both the website and the OKX mobile application. Where the steps are different, they’ve included screenshots and instructions for the app, too.
Step 1: Go to the margin trading section
Go to the OKX homepage and navigate to Trade in the top menu to see the available markets. Then, click Margin trading to open the margin trading section.

Step 2: Activate margin trading
OKX supports a unified account system. You can further customize your risk parameters by choosing between Single-currency and Multi-currency modes. The former ensures that only the currency traded will be used as a position’s margin. In Multi-currency margin mode, all assets held in your account are used as the margin.
In this tutorial, we will use Single-currency margin mode.
After clicking Select on your desired margin mode, you will need to verify that you understand and acknowledge the risks involved with margin trading. Check the box and click Submit to activate margin trading.

Step 3: Transfer funds to your trading account
Your trading account needs to be funded before you can start trading. If you do not have any balance in your trading account, click on Transfer from the Assets dropdown menu in the top navigation bar to move funds between accounts.
If you do not have any crypto assets on your OKX account, you can either buy crypto or learn how to deposit crypto on OKX with their beginner’s guide to crypto trading.
When your account has crypto assets, you can go to the Transfer section, as shown below, to move them from your “Funding account” to your “Trading account” to start trading.

Step 4: Choose the margin trading pair
You can now select your desired trading pair from the left bar on the margin trading dashboard. Click the trading pair toward the top of the screen and click Margin. If you don’t see Margin, use the switch icon to reveal it.
Now, select one of the trading pairs. Don’t worry about the leverage multiplier listed here. You can change it after making a selection.

Step 5: Choose your margin and leverage options
After selecting your trading pair, choose either “Cross” or “Isolated” as your margin mode. In Isolated margin mode, only designated funds will be used as your position’s margin — you can never lose more than the amount allocated. Cross margin mode, meanwhile, will attempt to use any available margin on your account and will keep changing.
If you choose Cross margin mode, you need to select the margin currency. From the second dropdown menu, choose USDT margined or margined in the crypto asset — in this case, BTC margined.
Finally, choose your leverage multiplier. We recommend starting very low if you’re new to leverage trading (e.g., 1x to 3x). Note: Trading with 1x leverage does not involve any borrowed funds and is the safest option for beginners.
If you need assistance in deciding the amount of leverage, you can look at the borrowing limit at the current leverage and the required maintenance margin. If the leverage chosen is higher than the recommended margin, the following warning message is displayed: “Your leverage is high. Please be aware of the associated risks.”
Click Confirm after you have chosen the desired leverage multiplier.

Step 6: Enter the details of the margin order
Now, select an “Order Type.” A limit order enables you to set the price at which your trade will execute, and a market order will executive your trade at the current market price — your order will fill instantly. “Stop,” “Trailing stop” and “Advanced limit” orders provide additional methods of mitigating risk and locking in profits.
Next, enter the “Price” and “Amount” to buy or sell.
You can also add levels at which to take profit or stop losses using the checkboxes. This dedicated guide covers these helpful risk management tools in greater detail.
In our BTC/USDT example, click on Buy (Long) BTC to buy BTC or click on Sell (Short) BTC if you want to sell BTC. On the following pop-up, check your order details and click Confirm.

Step 7: Review your transaction
After your trade is submitted and executed, you can review the status of your position by clicking on the “Order history” or “Positions” tabs at the bottom of the trading homepage. This section shows you useful information such as the “Filled and Order Amount,” “Avg. Filled Price and Order Price,” “Status” and so on.
If your order has not been executed, you can check its status under “Open orders.”

Step 8: (Optional) Close your position
If you would like to close your open position, you can enter the price and amount you wish to close and click Close in the “Positions” tab.
Alternatively, you can use the red MKT Close All option. This immediately exits your position at the market price. While it’s handy to quickly lock in profits or stop losses during extreme price volatility, you will pay a higher fee because you will be a taker in the market rather than a maker. You can read more about OKX fees

How to automate grid trading strategies on OKX
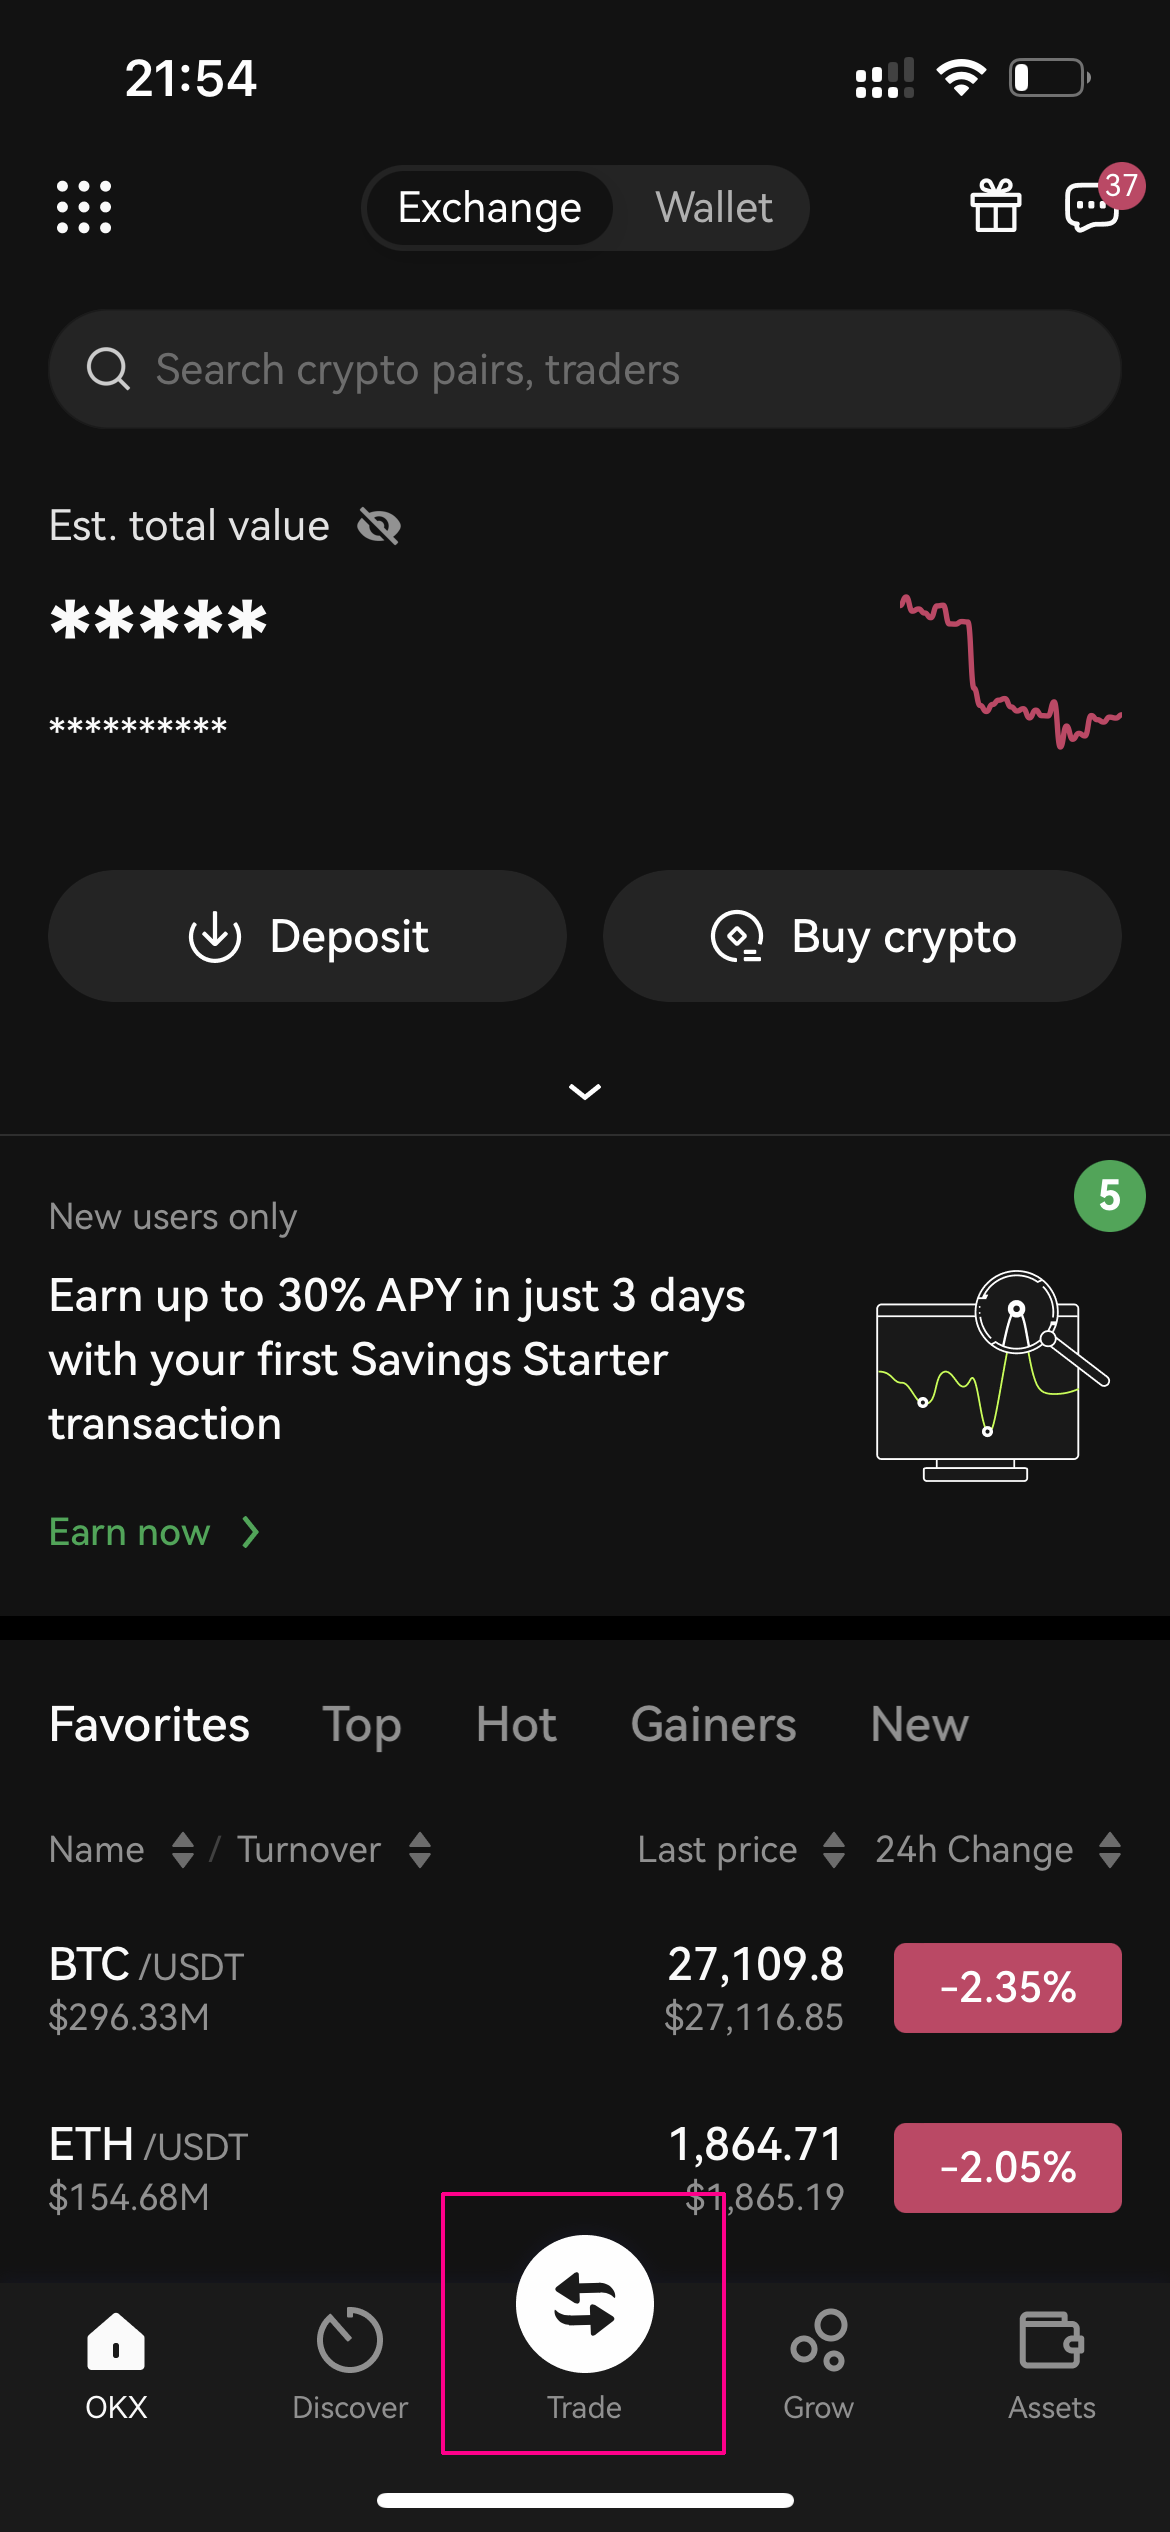
To access the spot grid crypto trading bot, navigate to the home page and tap on Trade.
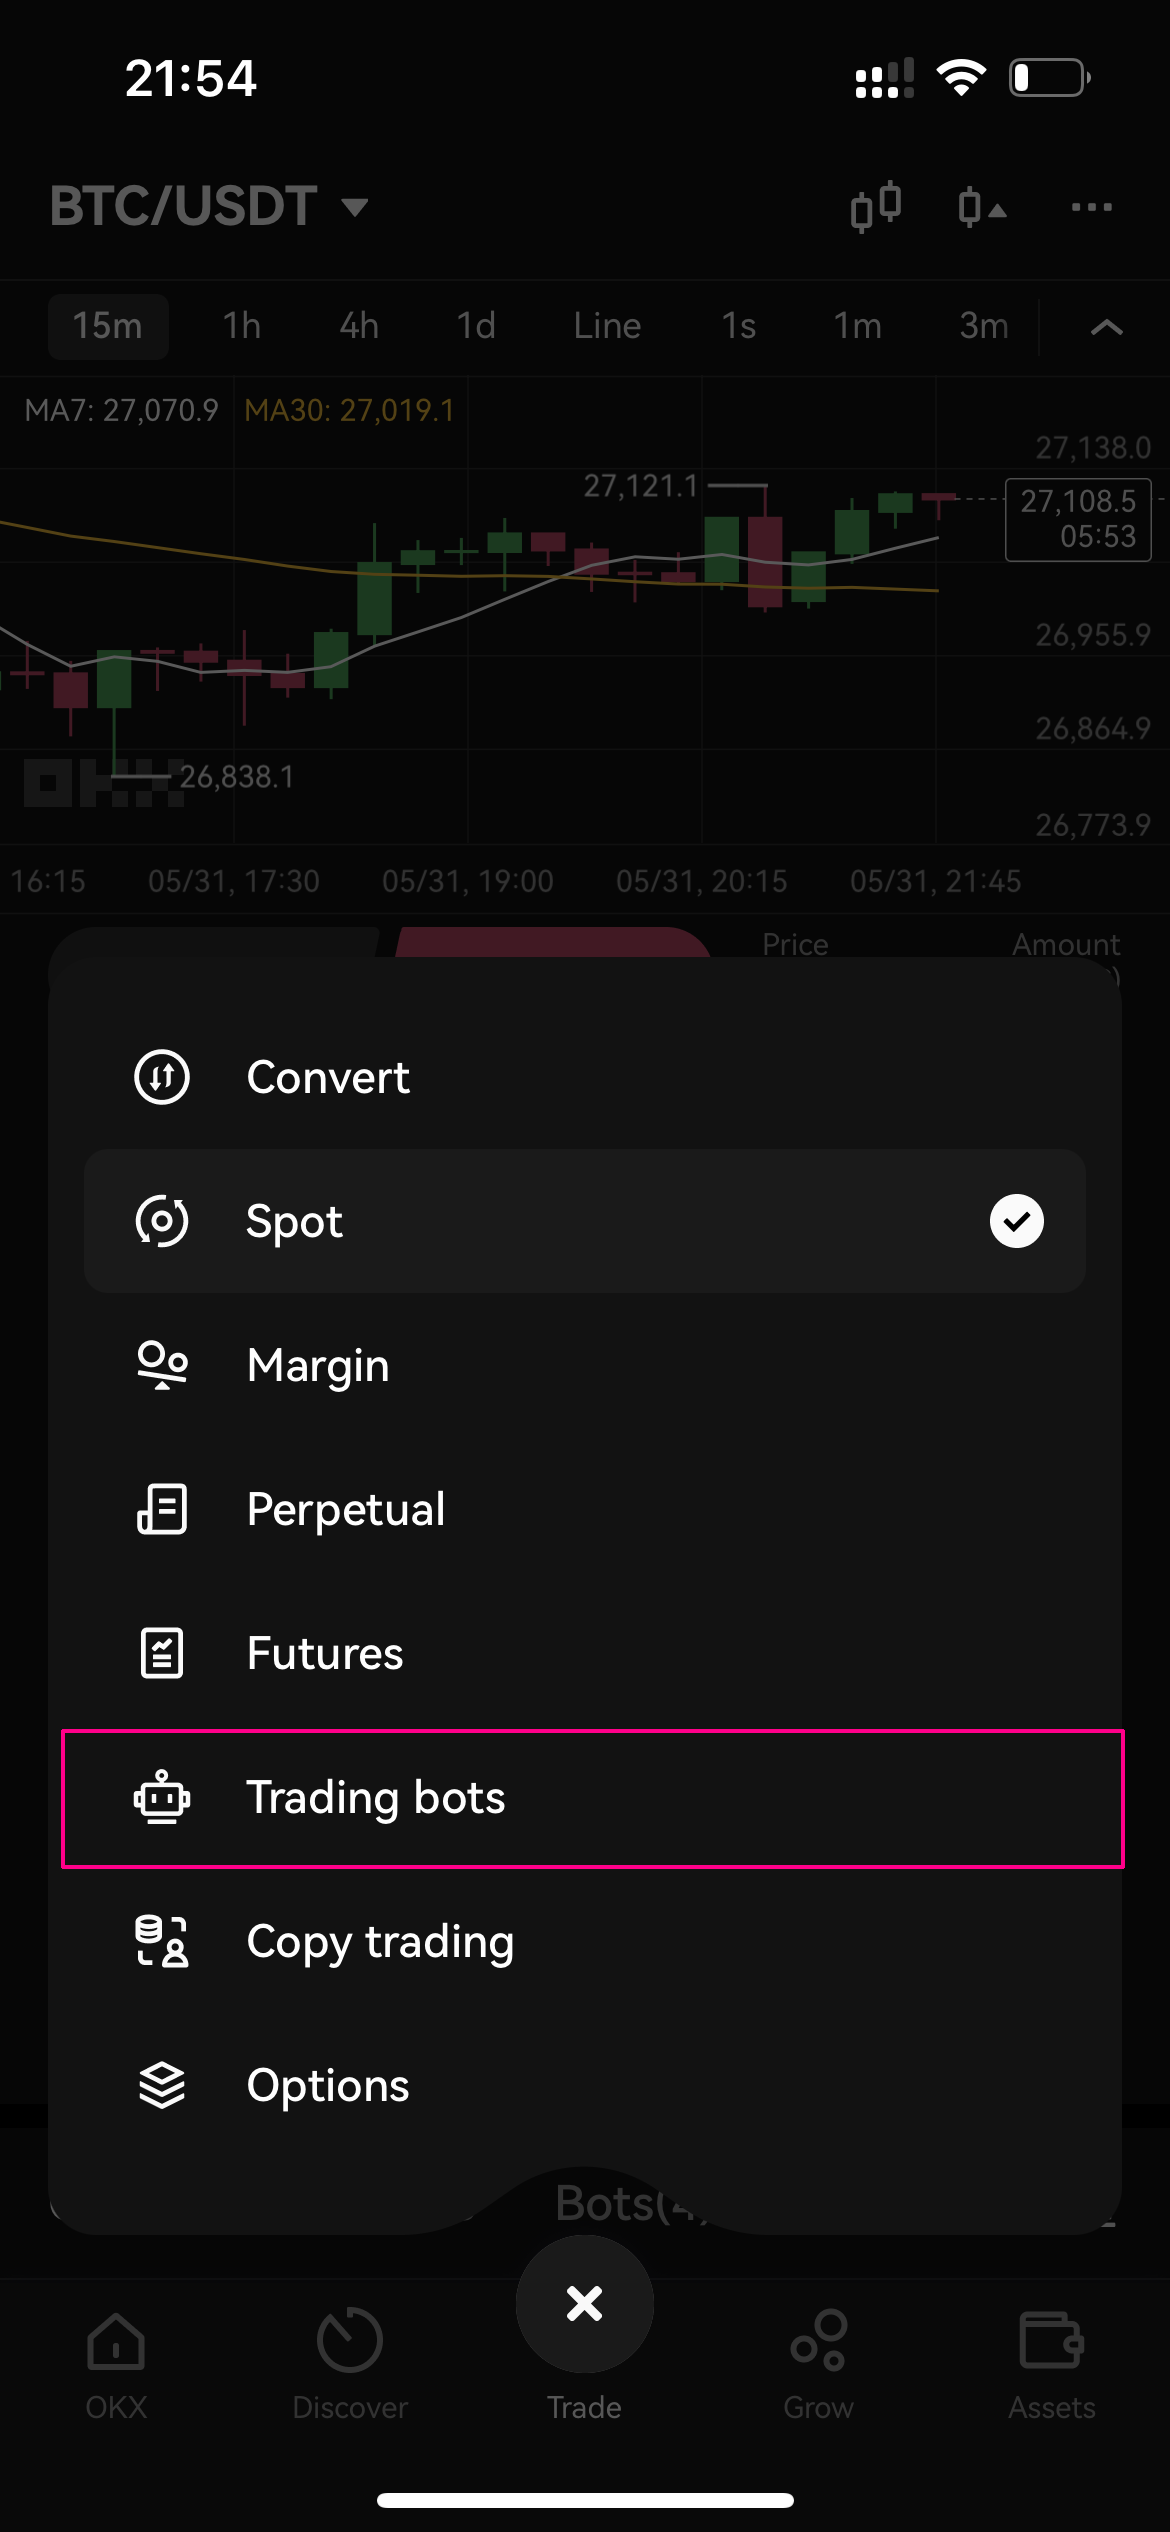
From the options available, choose Trading bots to access the bot marketplace.
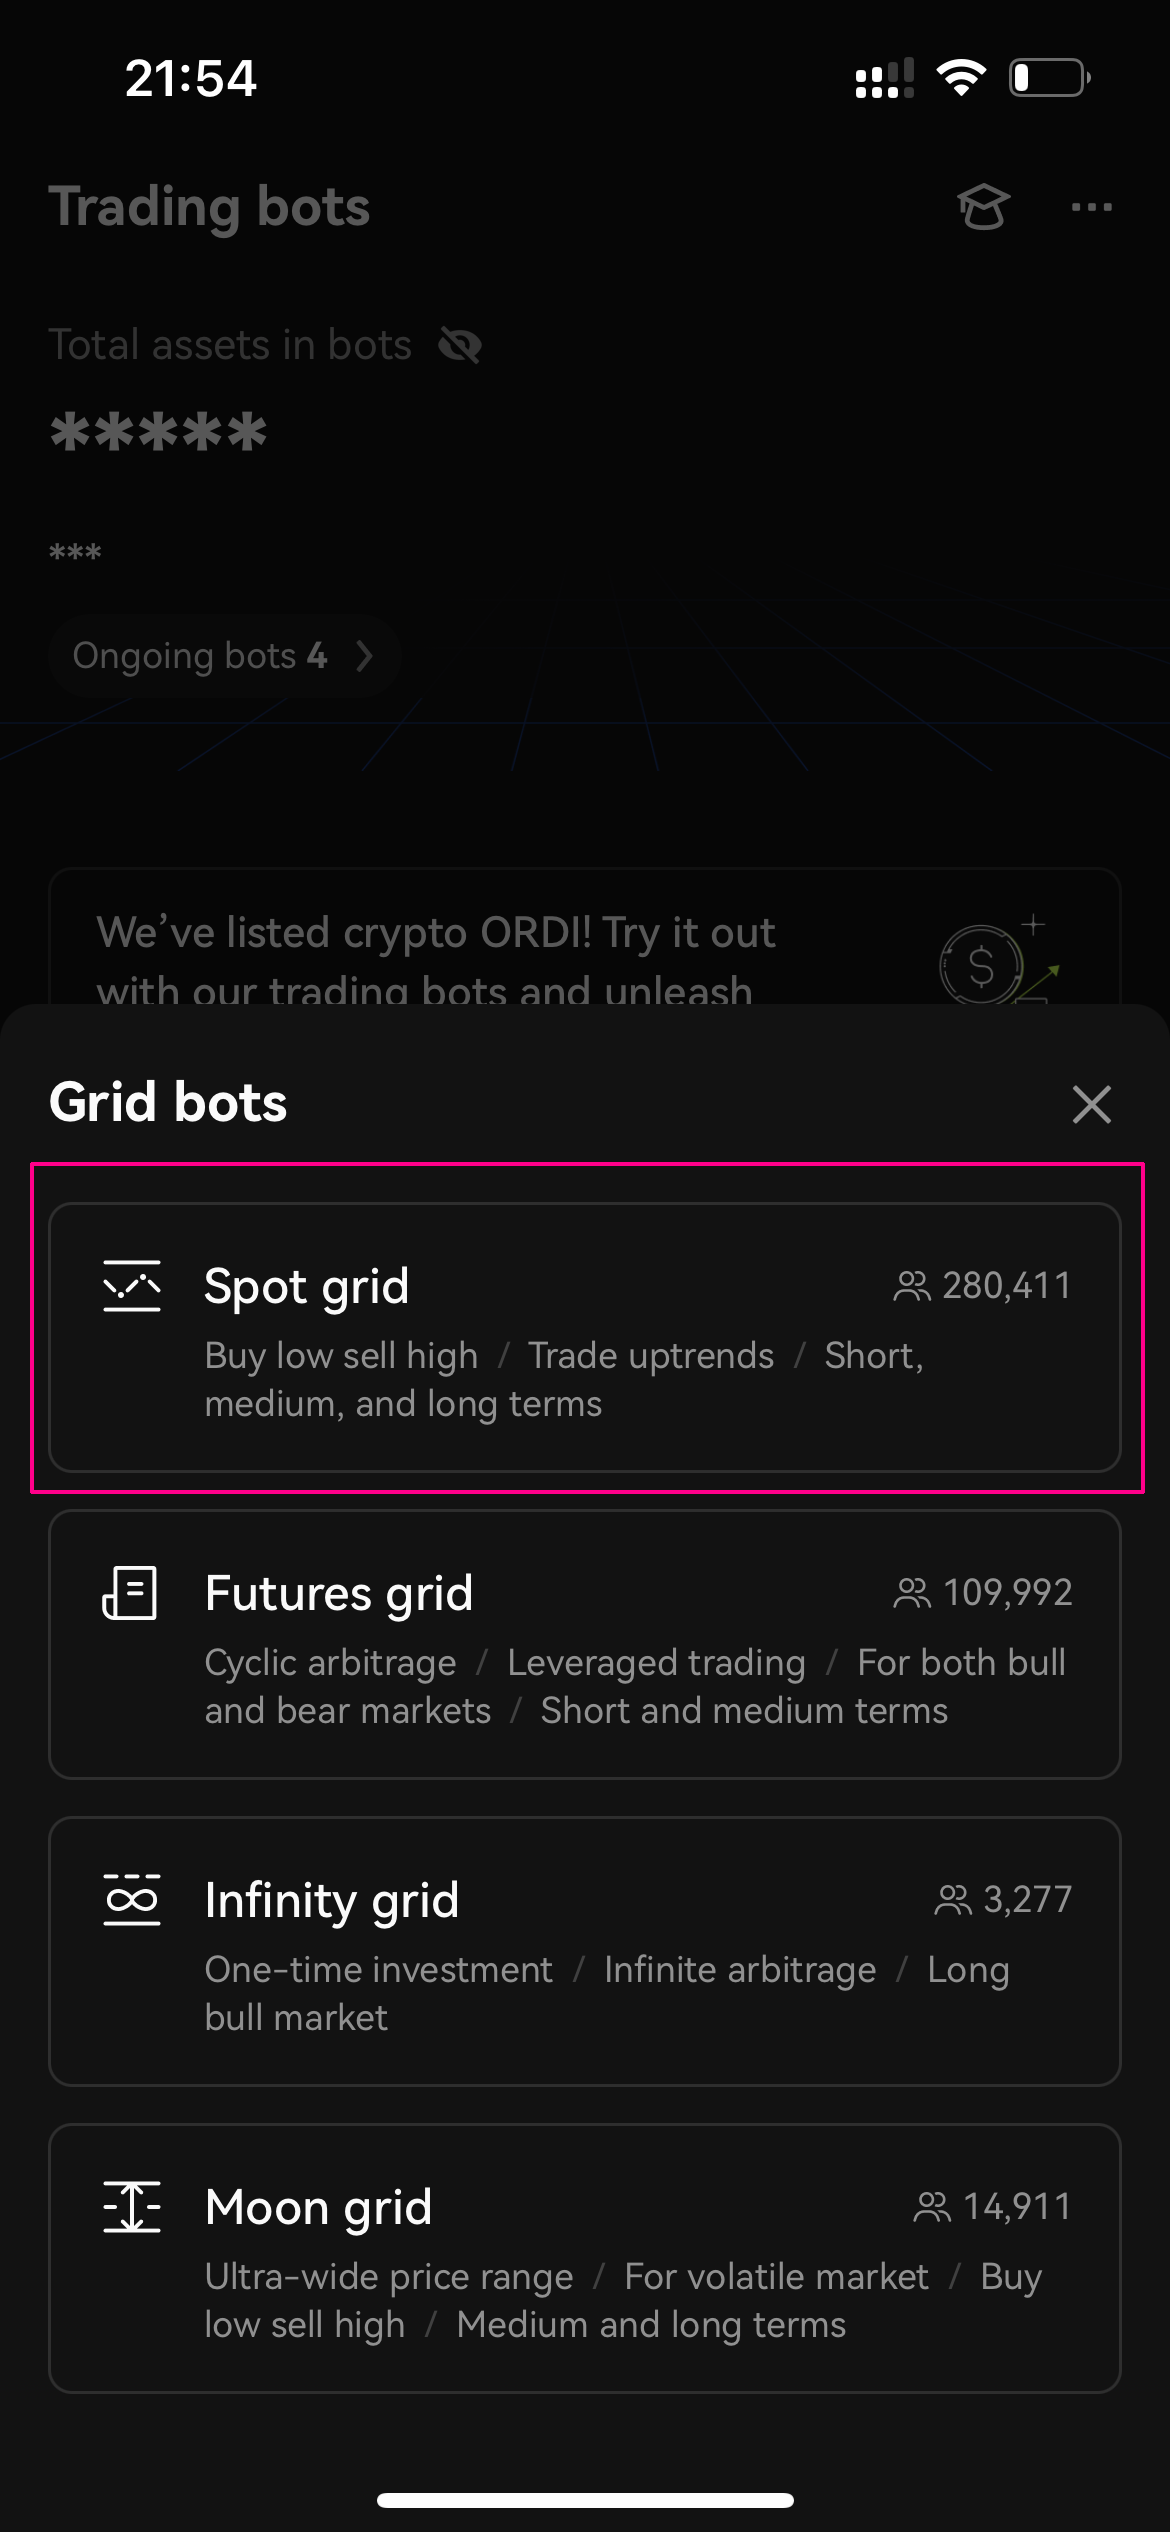
Within the Trading Bot Marketplace, select Grid bots

Tap on Spot grid to access the settings and configuration for spot grid trading.
Using the spot grid’s AI strategy
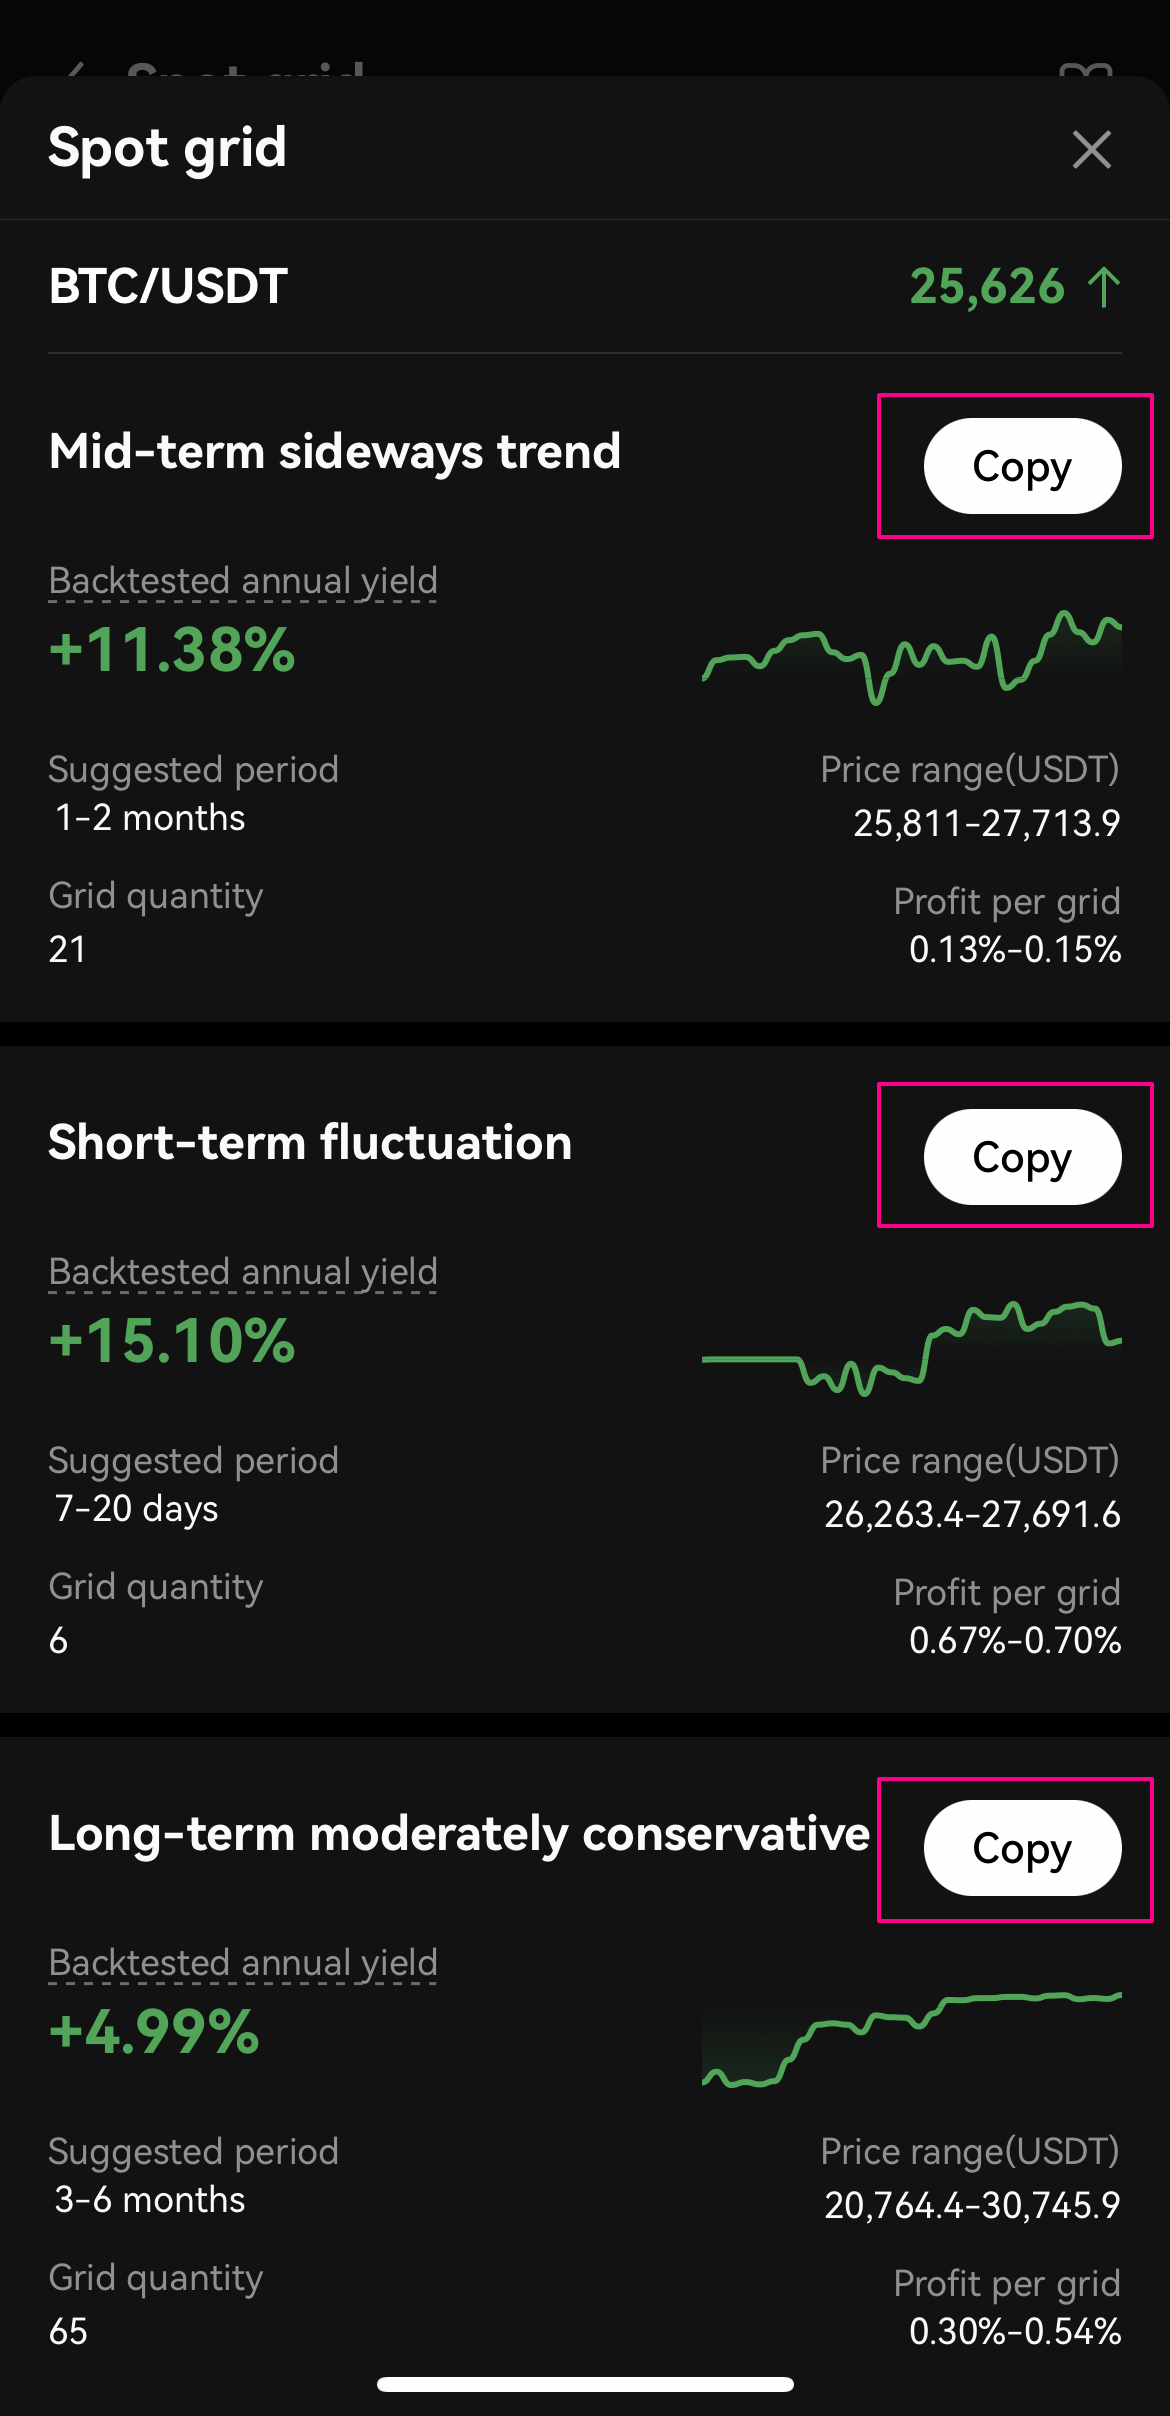
You can easily utilize OKX’s back-tested AI strategy in the Spot Grid trading bot. This feature automates the selection of grid parameters based on historical price data, simplifying the setup process and optimizing your trading experience.
Within the Spot Grid trading bot, locate the option labeled Recommended and click on it.
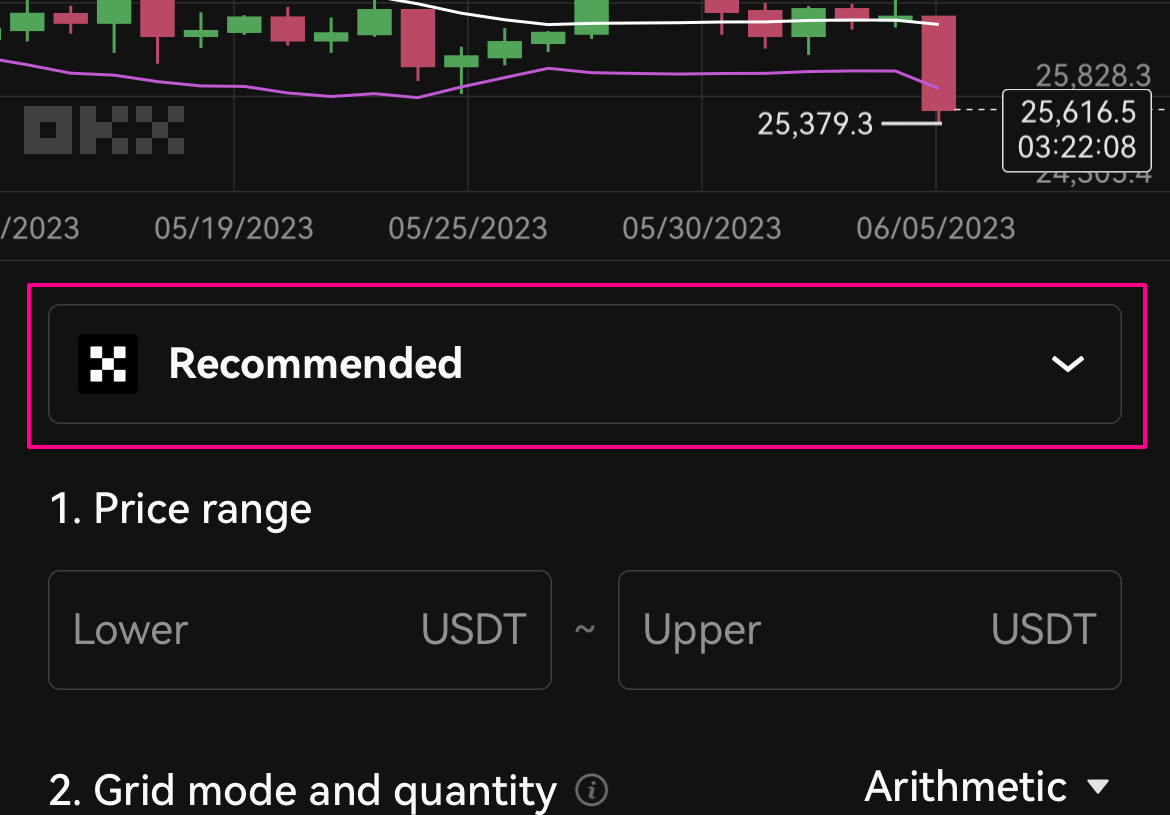
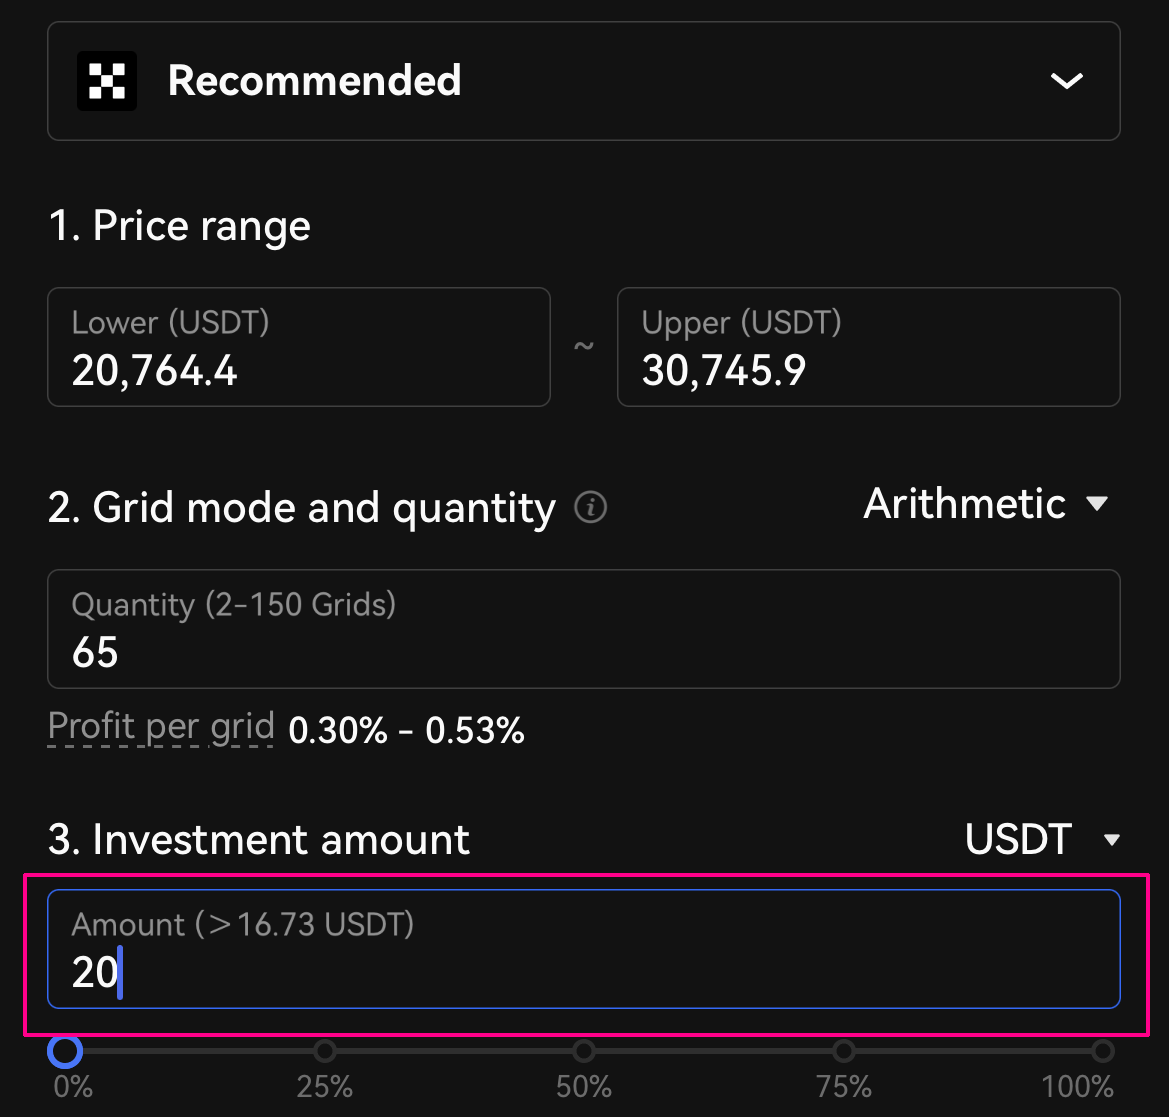
Choose the desired strategy duration from the available options: Short-term, Mid-term, or Long-term. This selection will determine the time frame for which the AI strategy will generate the grid parameters. After selecting the strategy duration, tap on the Copy button to apply the AI-generated parameters to your Spot Grid configuration.
Input your desired trading amount and tap on the Create.
Manually setting the spot grid parameters
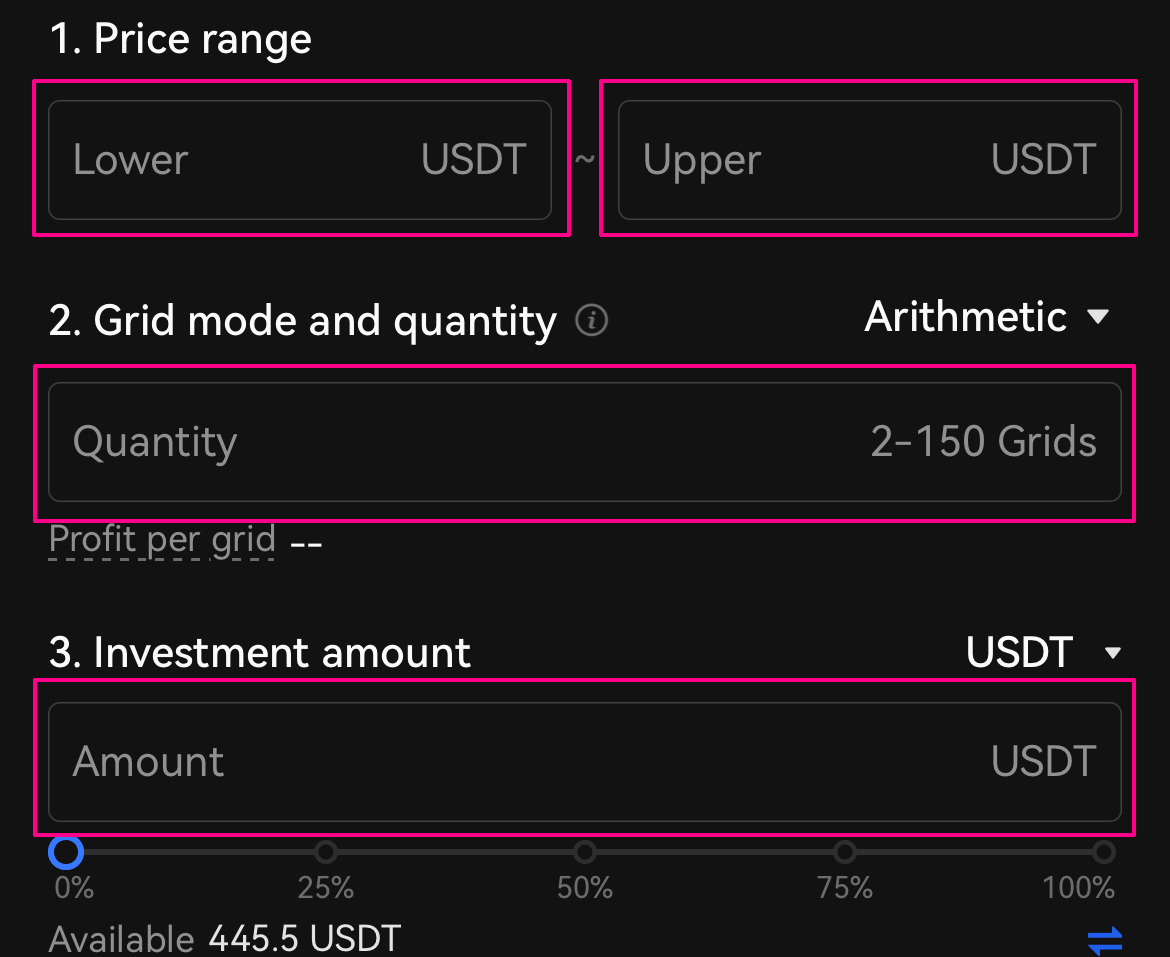
OKX’s crypto trading bot also allows you to manually determine the spot grid parameters. This can be riskier than using the AI strategy — particularly for novice traders. However, it does allow for greater user control and potentially higher profitability.
Enter the upper and lower price bounds for your desired trading range. Then, enter the number of grids you would like to fill the range. This will determine the size of the buy and sell orders the bot creates. Next, enter the total amount you want to open a position with and select the relevant cryptocurrency.
There is also an option to set how the grid is spaced. “Arithmetic” will position each grid line at fixed price intervals (e.g., every 20 USDT). Meanwhile, “Geometric” sets the grids using a fixed percentage from the current price, resulting in widening grids further out from the starting price.
When you have determined the spot grid parameters, tap Create.
On the next screen, you have the option to add a price at which to take profit from your trade or stop loss. These are useful if the asset price increases or decreases beyond the range you set, and they essentially exit your position either in profit or to limit further losses.
Enter your SL/TP levels, check the trade details and tap Confirm to deploy the spot grid trading bot.

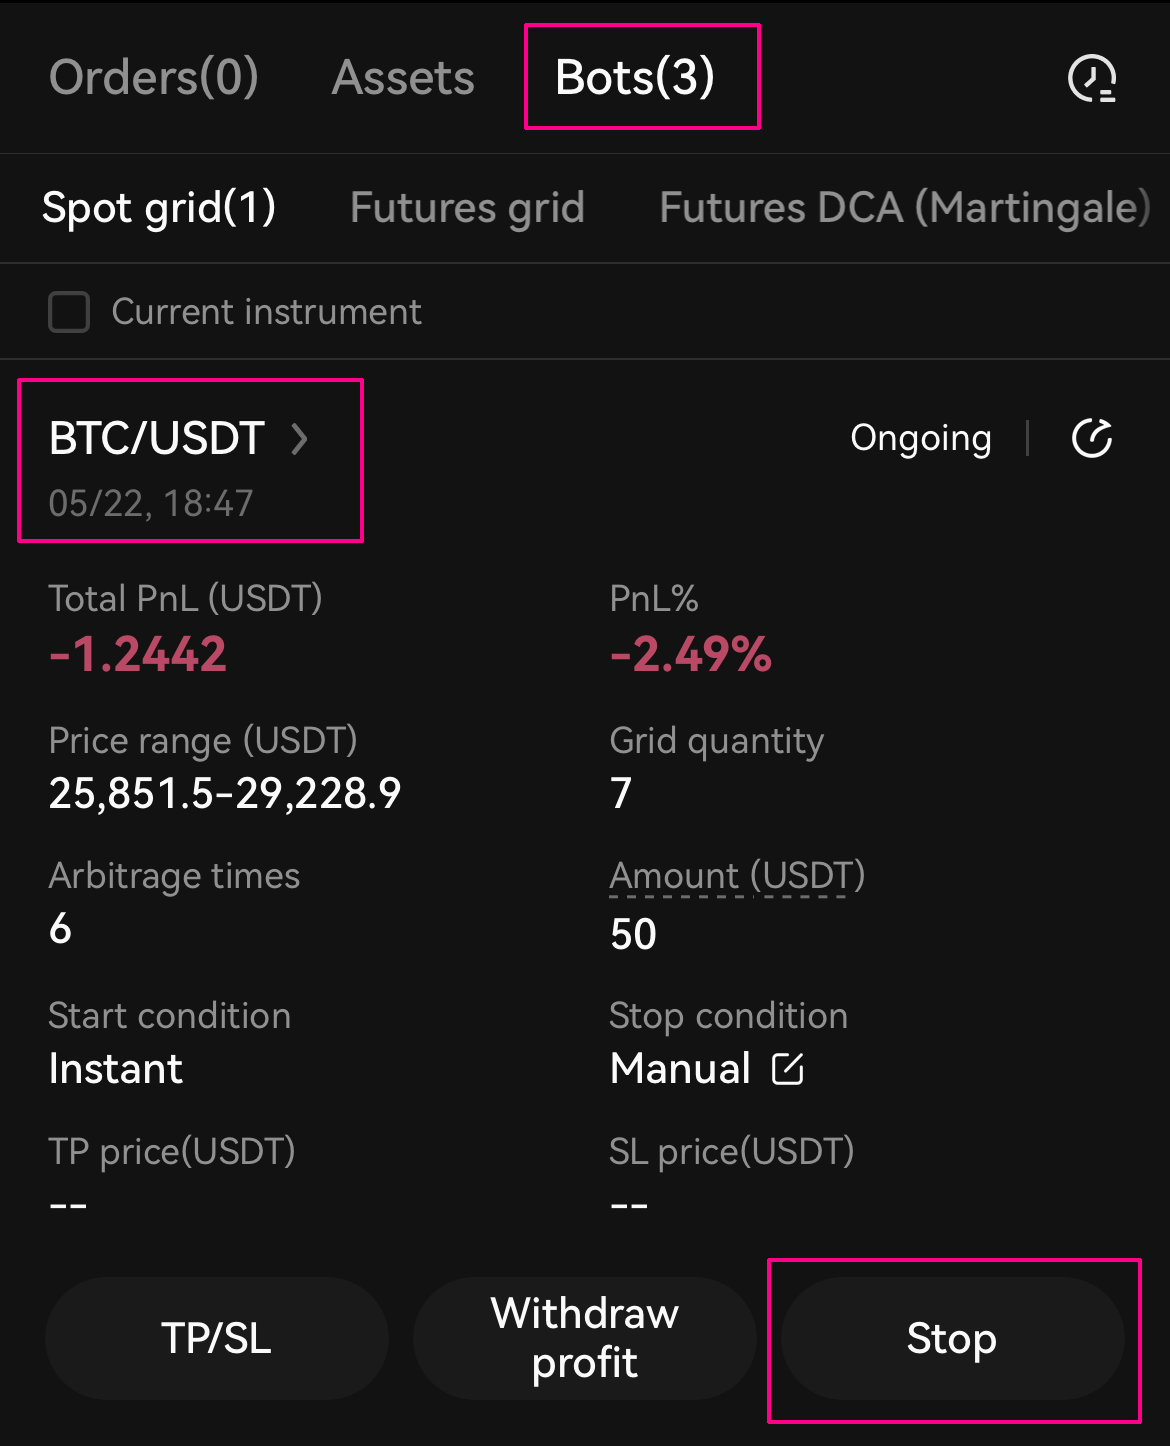
You can check your open positions in the Bots tab on the main trading dashboard. Tapping the bot will show additional information about the trade, including the open orders and trade histroy. Tapping Stop will exit your spot grid positions.
Take your spot grid to the next level with trailing settings
What is trailing settings?
Trailing settings is an advanced feature that takes the power of our spot grid trading bot to new heights. With trailing settings, you can automatically extend the grid upwards or downwards, ensuring your trades stay in sync with market movements. It’s designed to maximize your profit potential in both rising and falling markets, not just in sideways markets.
When to use trailing settings
Trailing settings is particularly beneficial in volatile markets where prices can rapidly move up or down. It enables you to capture opportunities and adapt your trading strategy to changing market conditions. Whether you’re navigating a bullish run or a bearish trend, trailing settings empower you to make the most of every price swing.
Use case: Seizing market opportunities
Imagine a scenario where the market experiences a strong upward movement. With trailing settings, you can enable trailing up to set your initial grid range and let the bot automatically extend the grid upwards as the price rises. This allows you to continuously profit from upward momentum, capturing gains at each grid level and maximizing your growth potential.
On the flip side, in a market downturn, enabling trailing down will extend the grid downwards, allowing you to take advantage of falling prices. By automatically adjusting your grid range, you can strategically enter buy positions at lower levels and sell positions at optimal points, maximizing profitability even in bearish conditions.
Trailing settings empowers you to adapt to market dynamics, capitalize on price movements, and unlock greater profit potential. It’s a game-changer for traders looking to stay ahead in any market situation.
Using trailing settings in the spot grid trading bot
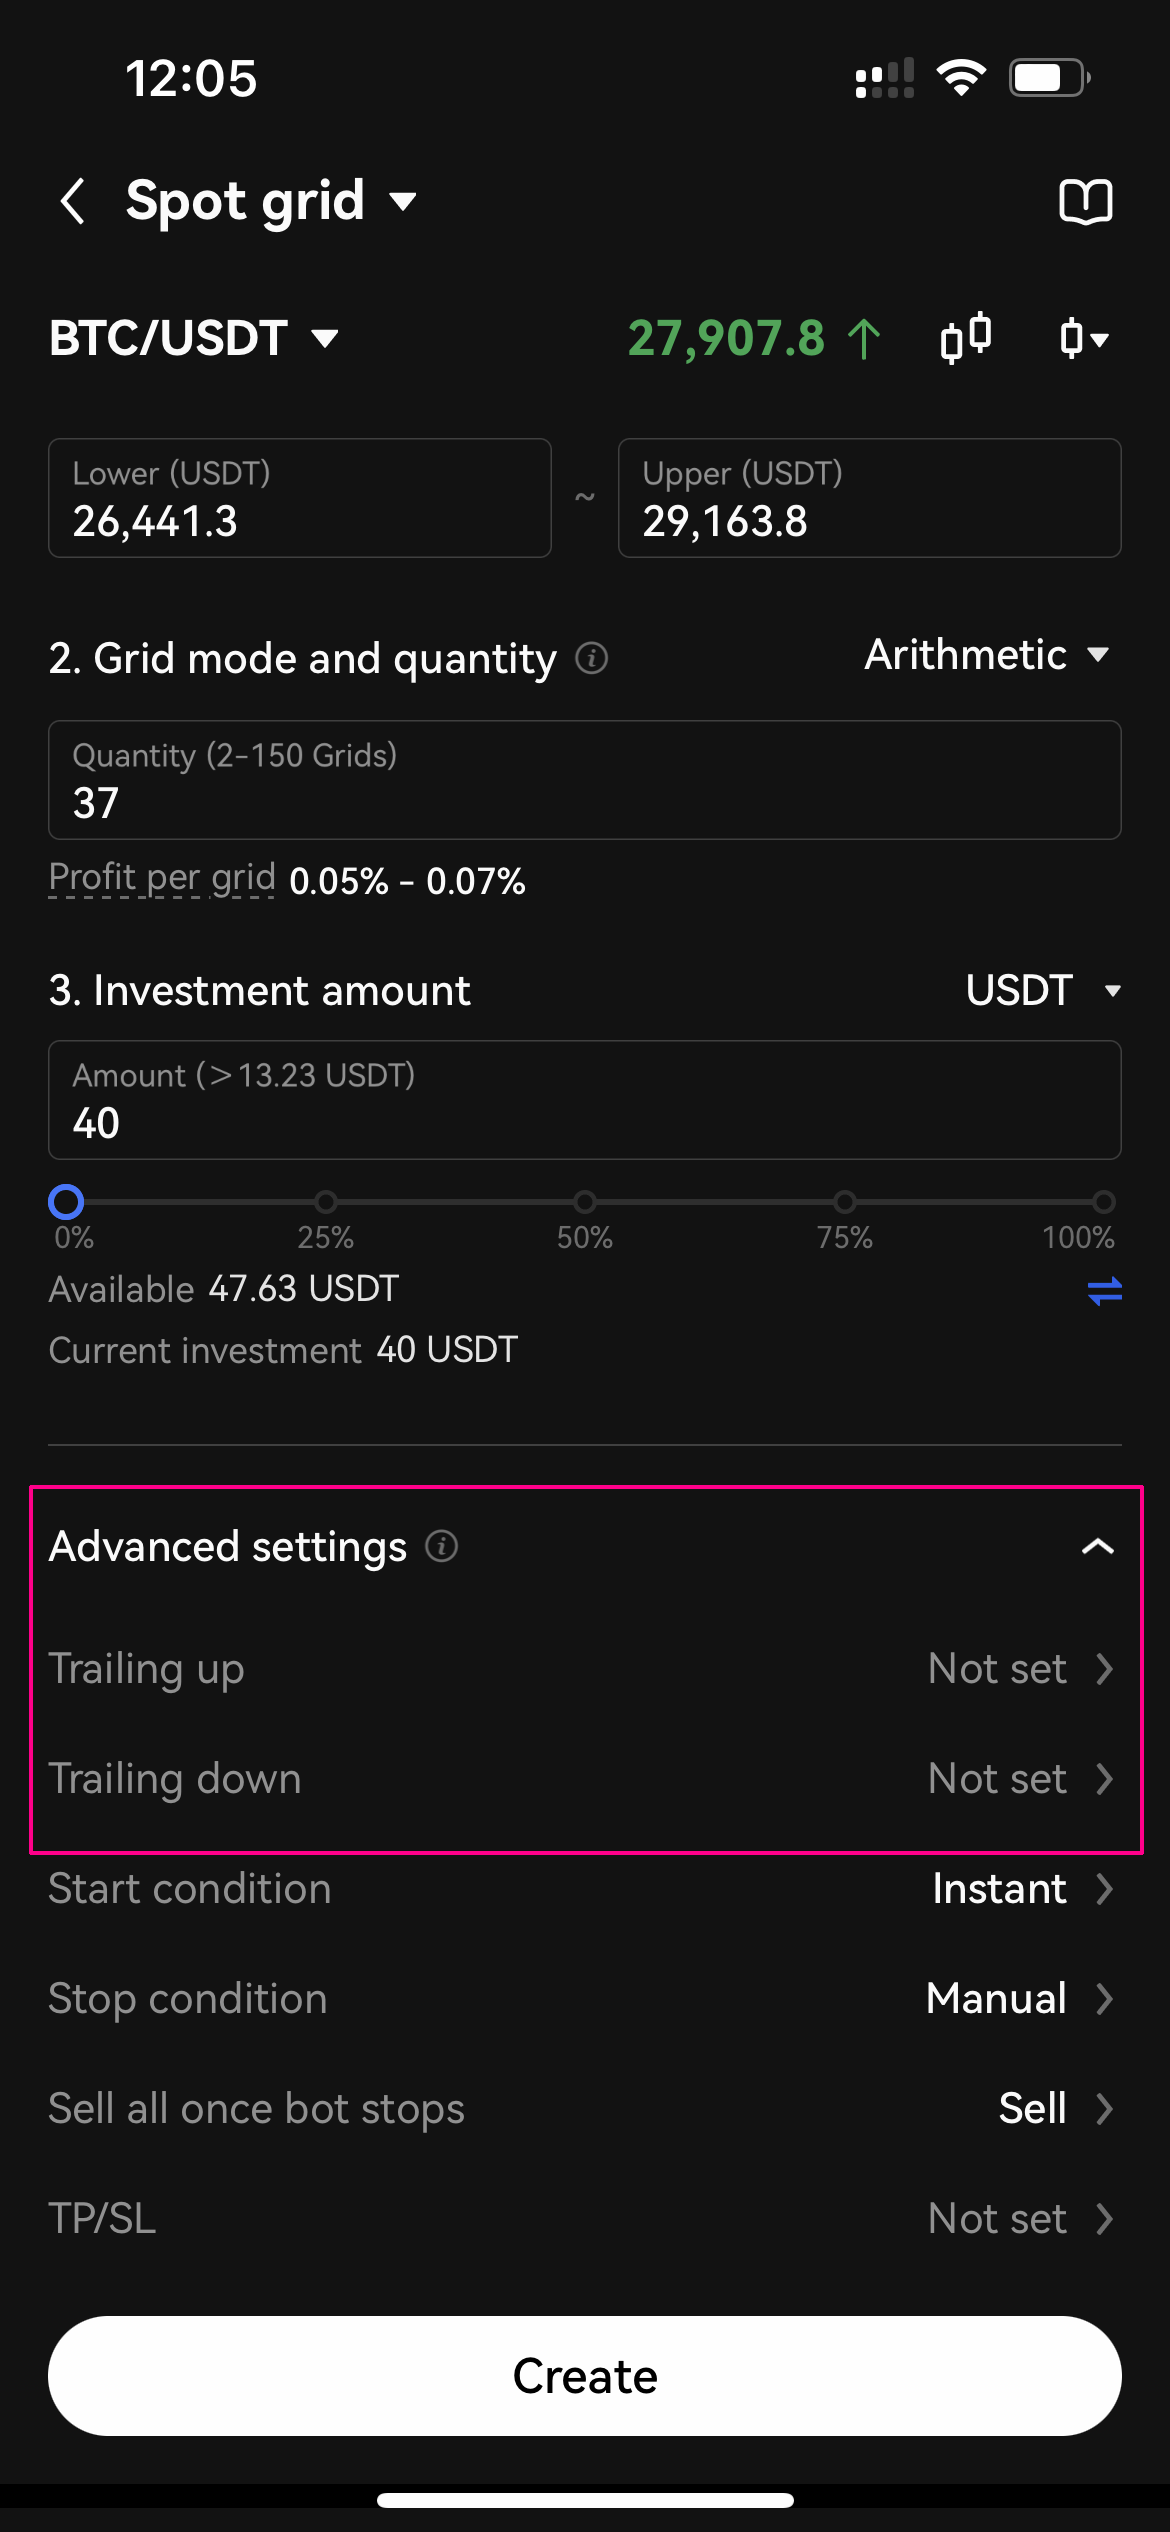
1. Create a spot grid: Start by creating a spot grid in the trading bot interface. Scroll down to the advanced settings section, where you’ll find the trailing up and trailing down options. Click on “Not set” to access the popup window.
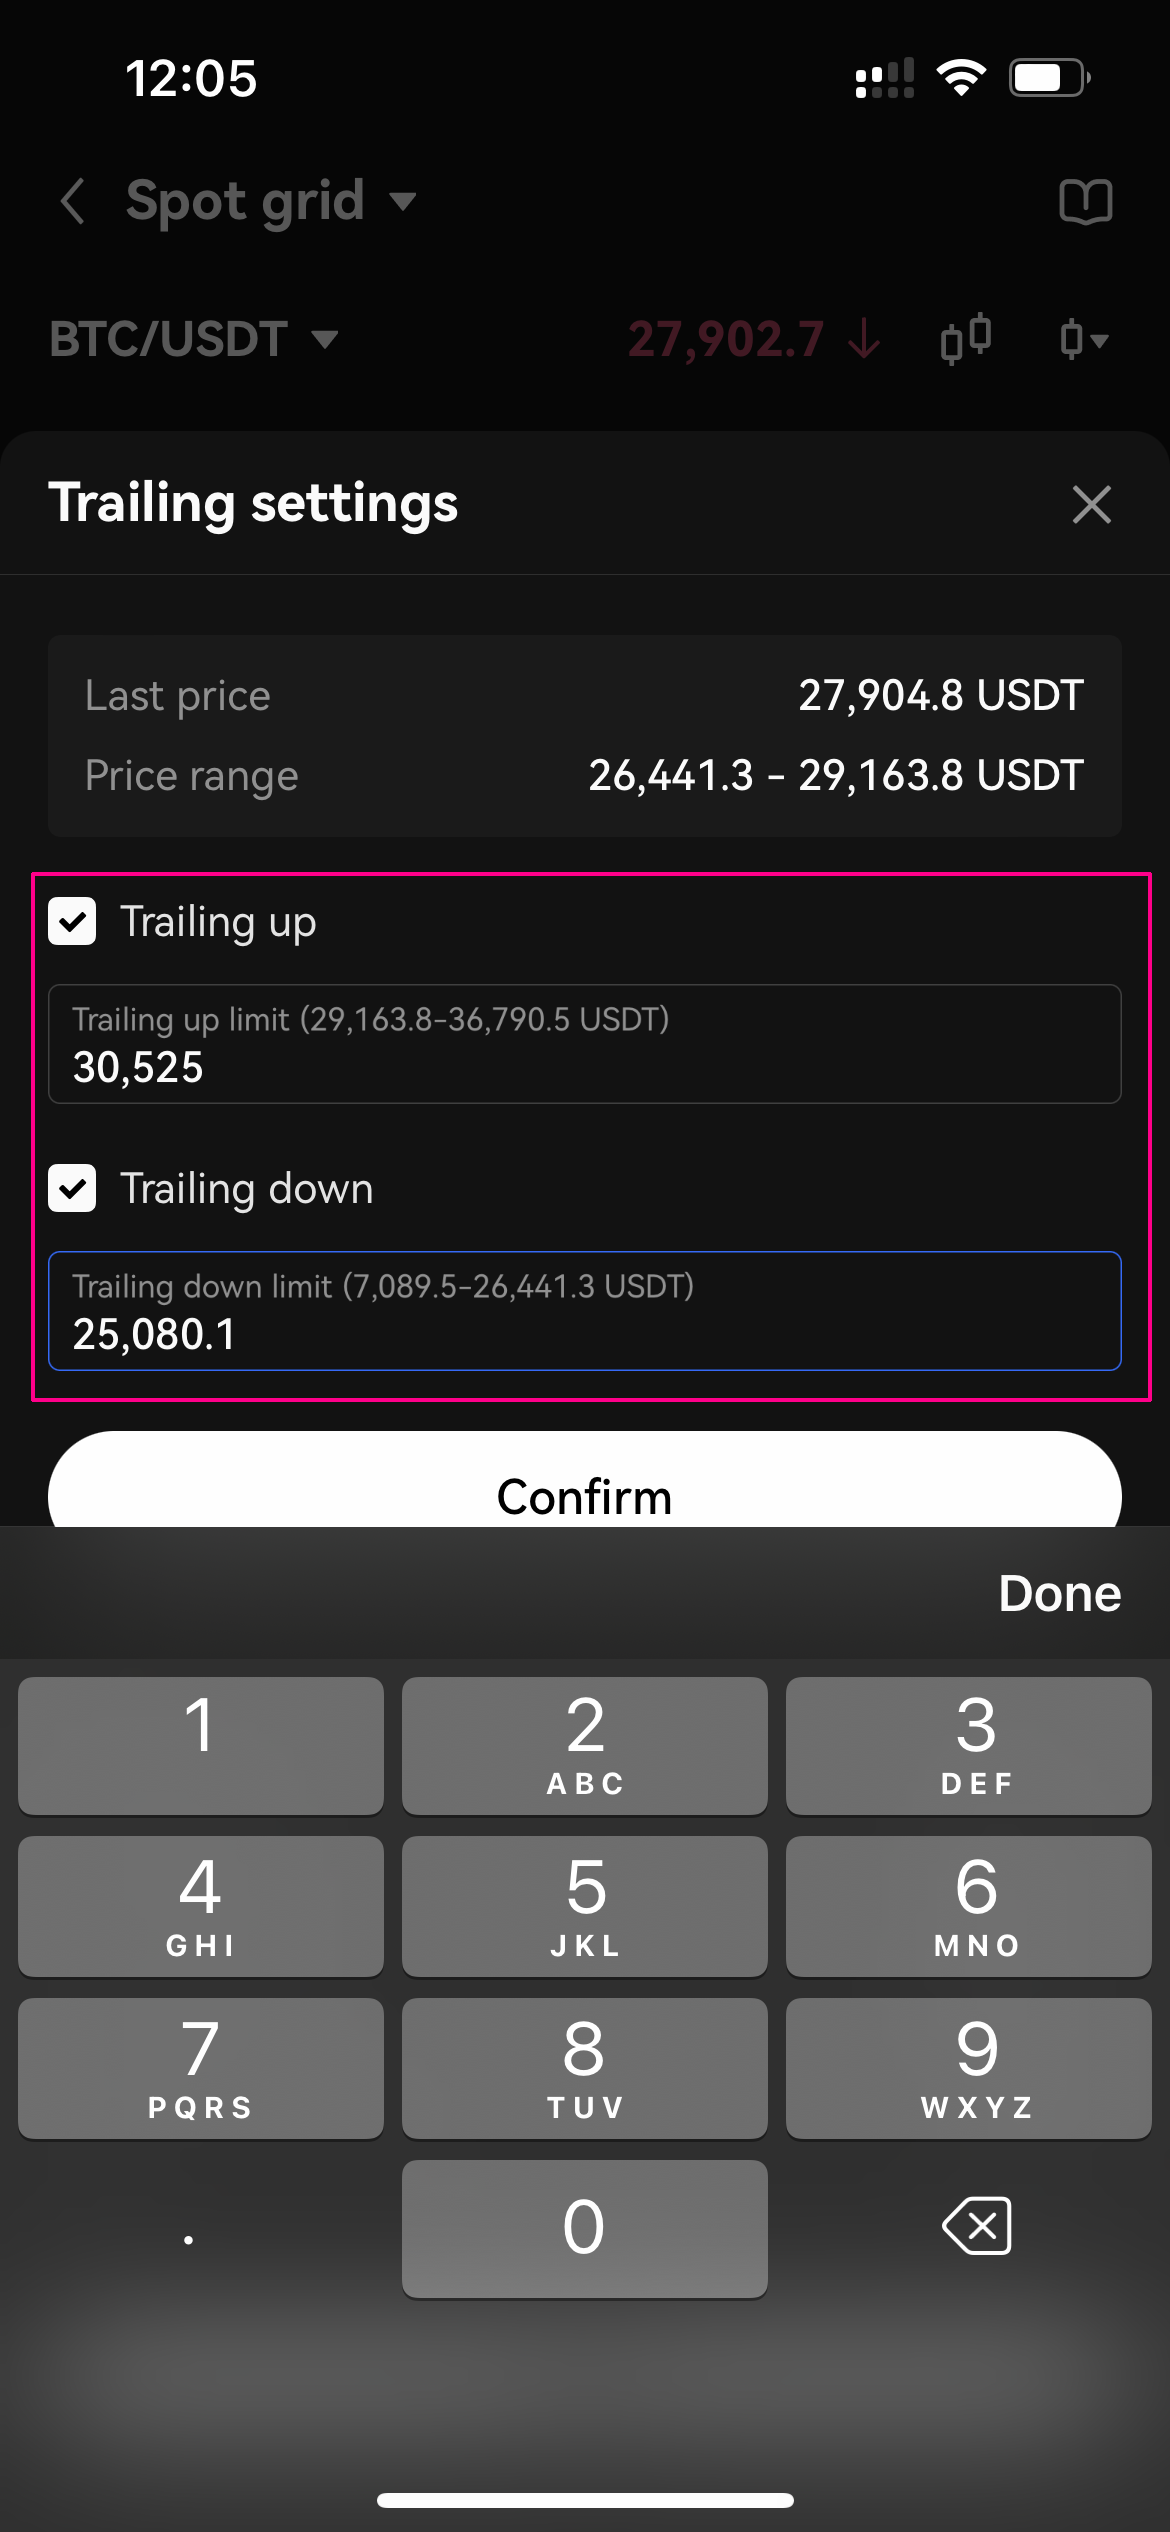
2. Enable Trailing Settings: To activate trailing up and trailing down, simply check the respective boxes. Then, input a price limit that suits your trading strategy. Once you’re done, click “Confirm” to save the settings.
3. Create and confirm the order: After configuring the trailing settings, click “Create” to generate the spot grid order. Review the order details, ensuring the trailing settings are correctly set. Once you’re satisfied, click “Confirm” to finalize and execute the order.
Automate spot trades with OKX’s grid trading bot
OKX’s spot grid crypto trading bot is an easy-to-use method of automating buys and sells. Those who want to profit from the extreme volatility associated with cryptocurrencies but might not have the time to study charts and actively manage positions are helped by the spot grid bot.
Equipped with a back-tested AI strategy, even absolute newcomers to crypto trading can deploy the bot in just a few clicks. Meanwhile, more experienced traders can tweak the parameters themselves to potentially take even greater advantage of price volatility. Game on!


