Instructions for creating an account and depositing – withdrawing money on MEXC
How to Sign Up for a MEXC Account on the Website?
Step 1: Visit the official MEXC website at www.mexc.com and click [Sign Up] on the top right corner.
Step 2: Select your preferred sign-up method. You can sign up using your email / mobile number.

Step 3: Enter your mobile number or email address, then set a password according to the requirements.
Step 4: Tick the box to confirm that you have read and agree to the User Agreement and Privacy Policy, then click [Sign Up]. Please note that if you sign up via a referral link, the system will automatically fill in the referral code and it cannot be modified.
Step 5: After clicking [Sign Up], a pop-up window will appear. Please complete the captcha in the pop-up window and enter the verification code you received via mobile phone / email, depending on the sign-up method you selected. If the verification is successful, you will have completed the sign-up process.
How To Complete KYC?
What Is KYC?
KYC is short for Know Your Customer.The idea is to fully understand your customers.It also means real name verification.
Why Is KYC Important?
1.KYC can enhance the security of your assets.
2.Different levels of KYC can unlock different trading permissions and financial activities.
3.Complete KYC to increase the single transaction limit for buying and withdrawing funds.
4.Completing KYC can increase your futures bonus benefits.
MEXC KYC Classifications & Differences
There are two types of MEXC KYC: primary & advanced.
Basic personal information is required for primary KYC. Completing primary KYC enables an increase in the 24-hour withdrawal limit to 80 BTC, with no limit on OTC transactions.
Advanced KYC requires basic personal information and facial recognition authentication.Completing advanced KYC enables an increase in the 24-hour withdrawal limit to 200 BTC, with no limit on OTC transactions.
Primary KYC on the Website:
Step 1: Log in to the official MEXC website and enter your account.
Click on the user icon on the top right corner – [Identification]
Step 2: Next to “Primary KYC”, click on [Verify].You can also skip primary KYC and proceed to advanced KYC directly.
 Step 3:
 Select your Nationality of ID and ID Type.
Step 4: Enter your Name, ID Number, and Date of Birth.
Step 5: Take photos of the front and back of your ID card, and upload them.
Please ensure that your photo is clear and visible, and all four corners of the document are intact.Once completed, click on [Submit for review].The result of primary KYC will be available in 24 hours.
Advanced KYC on the Website
Step 1: Log in to the official MEXC website and enter your account.
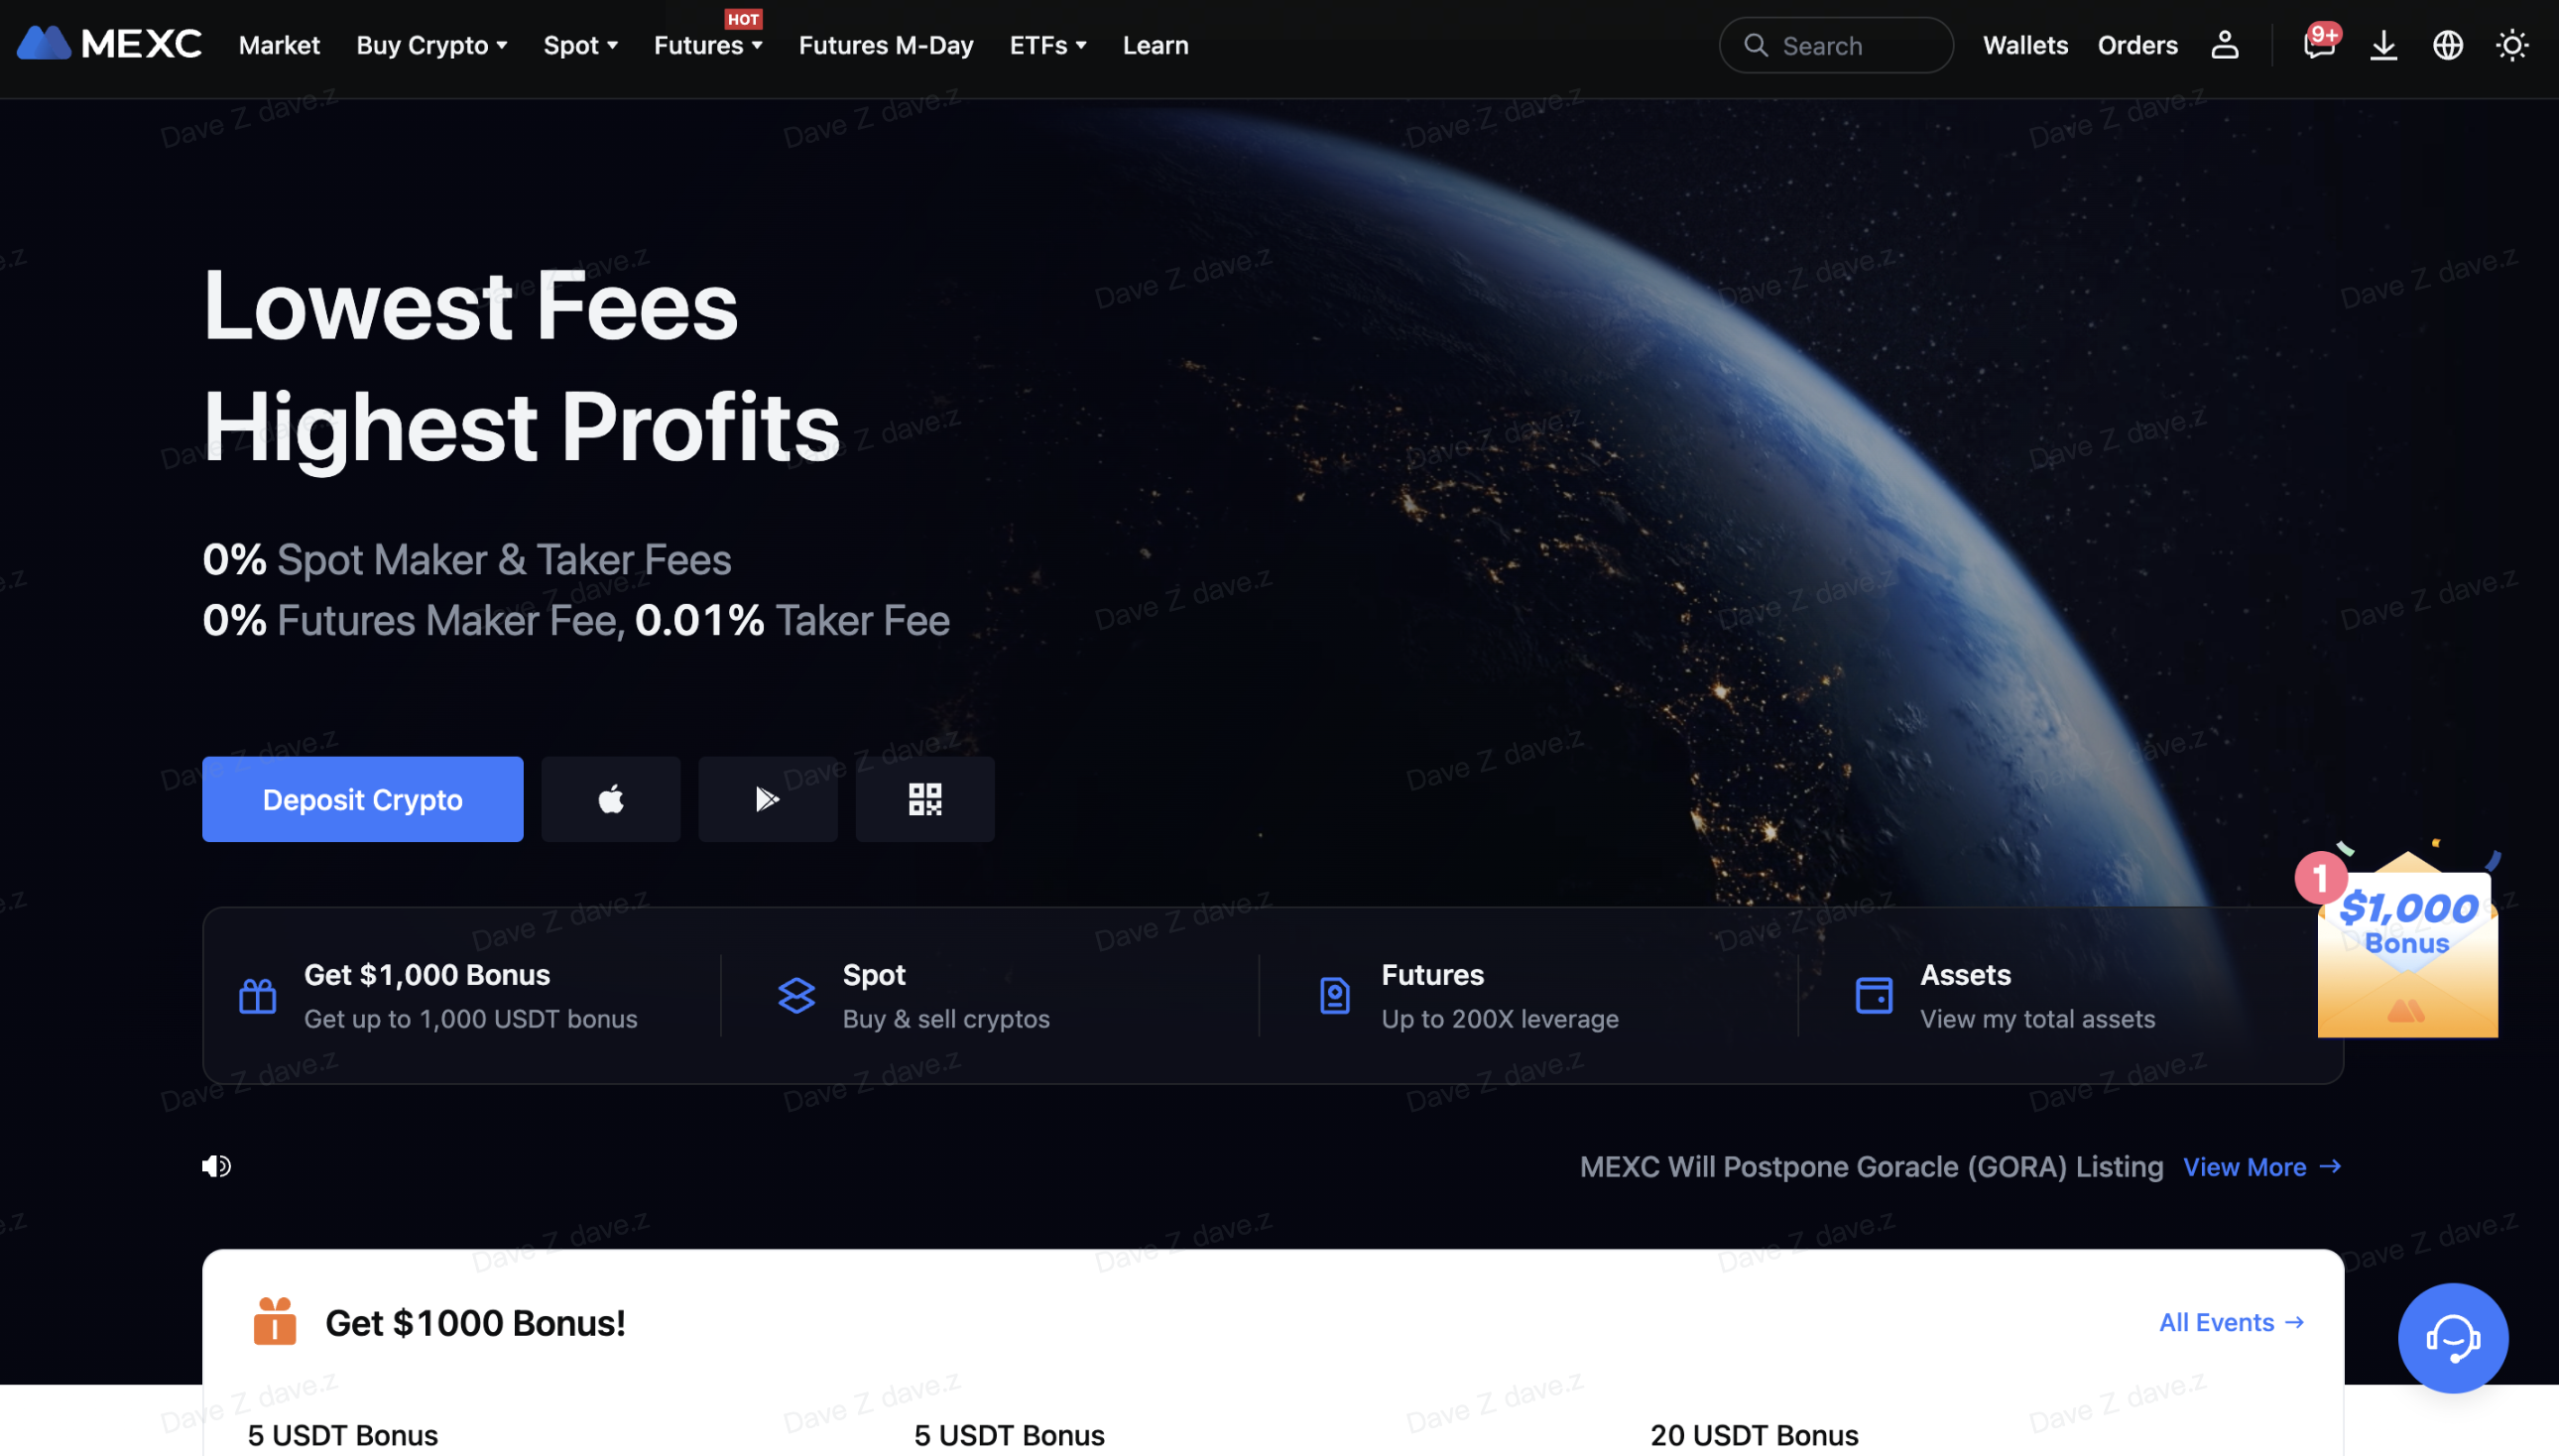
Click on the user icon on the top right corner – [Identification].
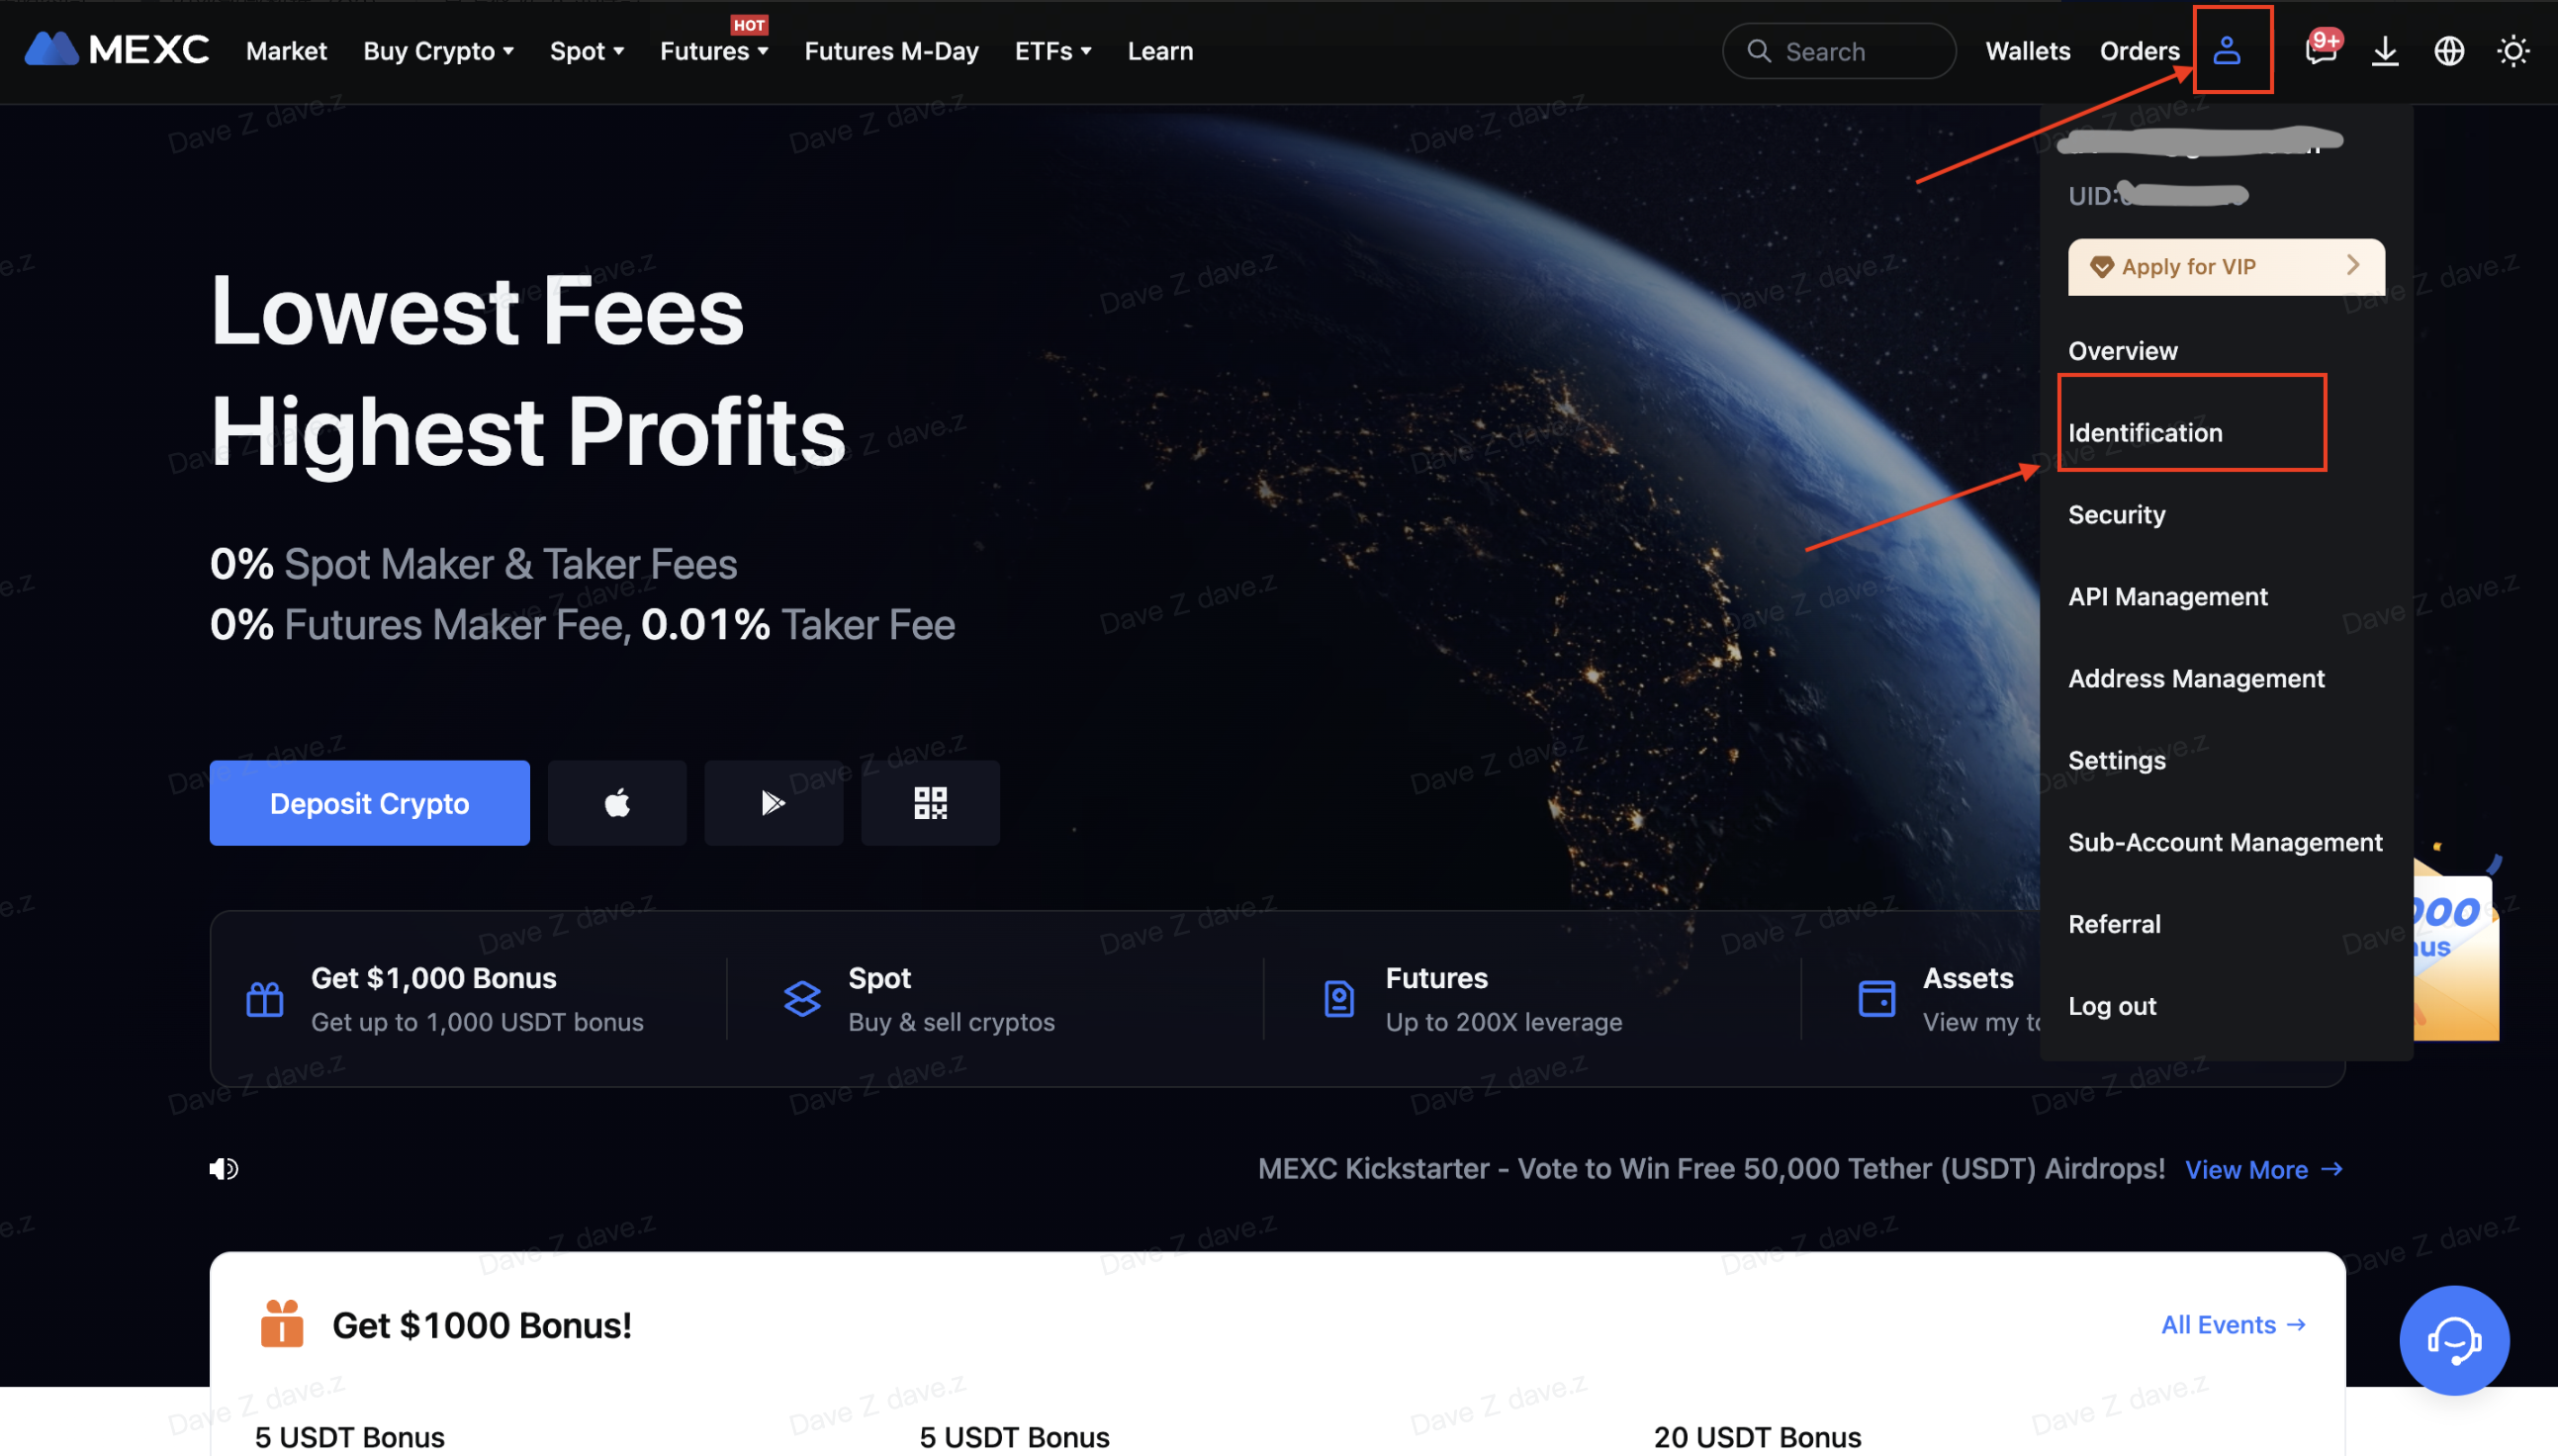
Step 2: Next to “Advanced KYC”, click on [Verify].
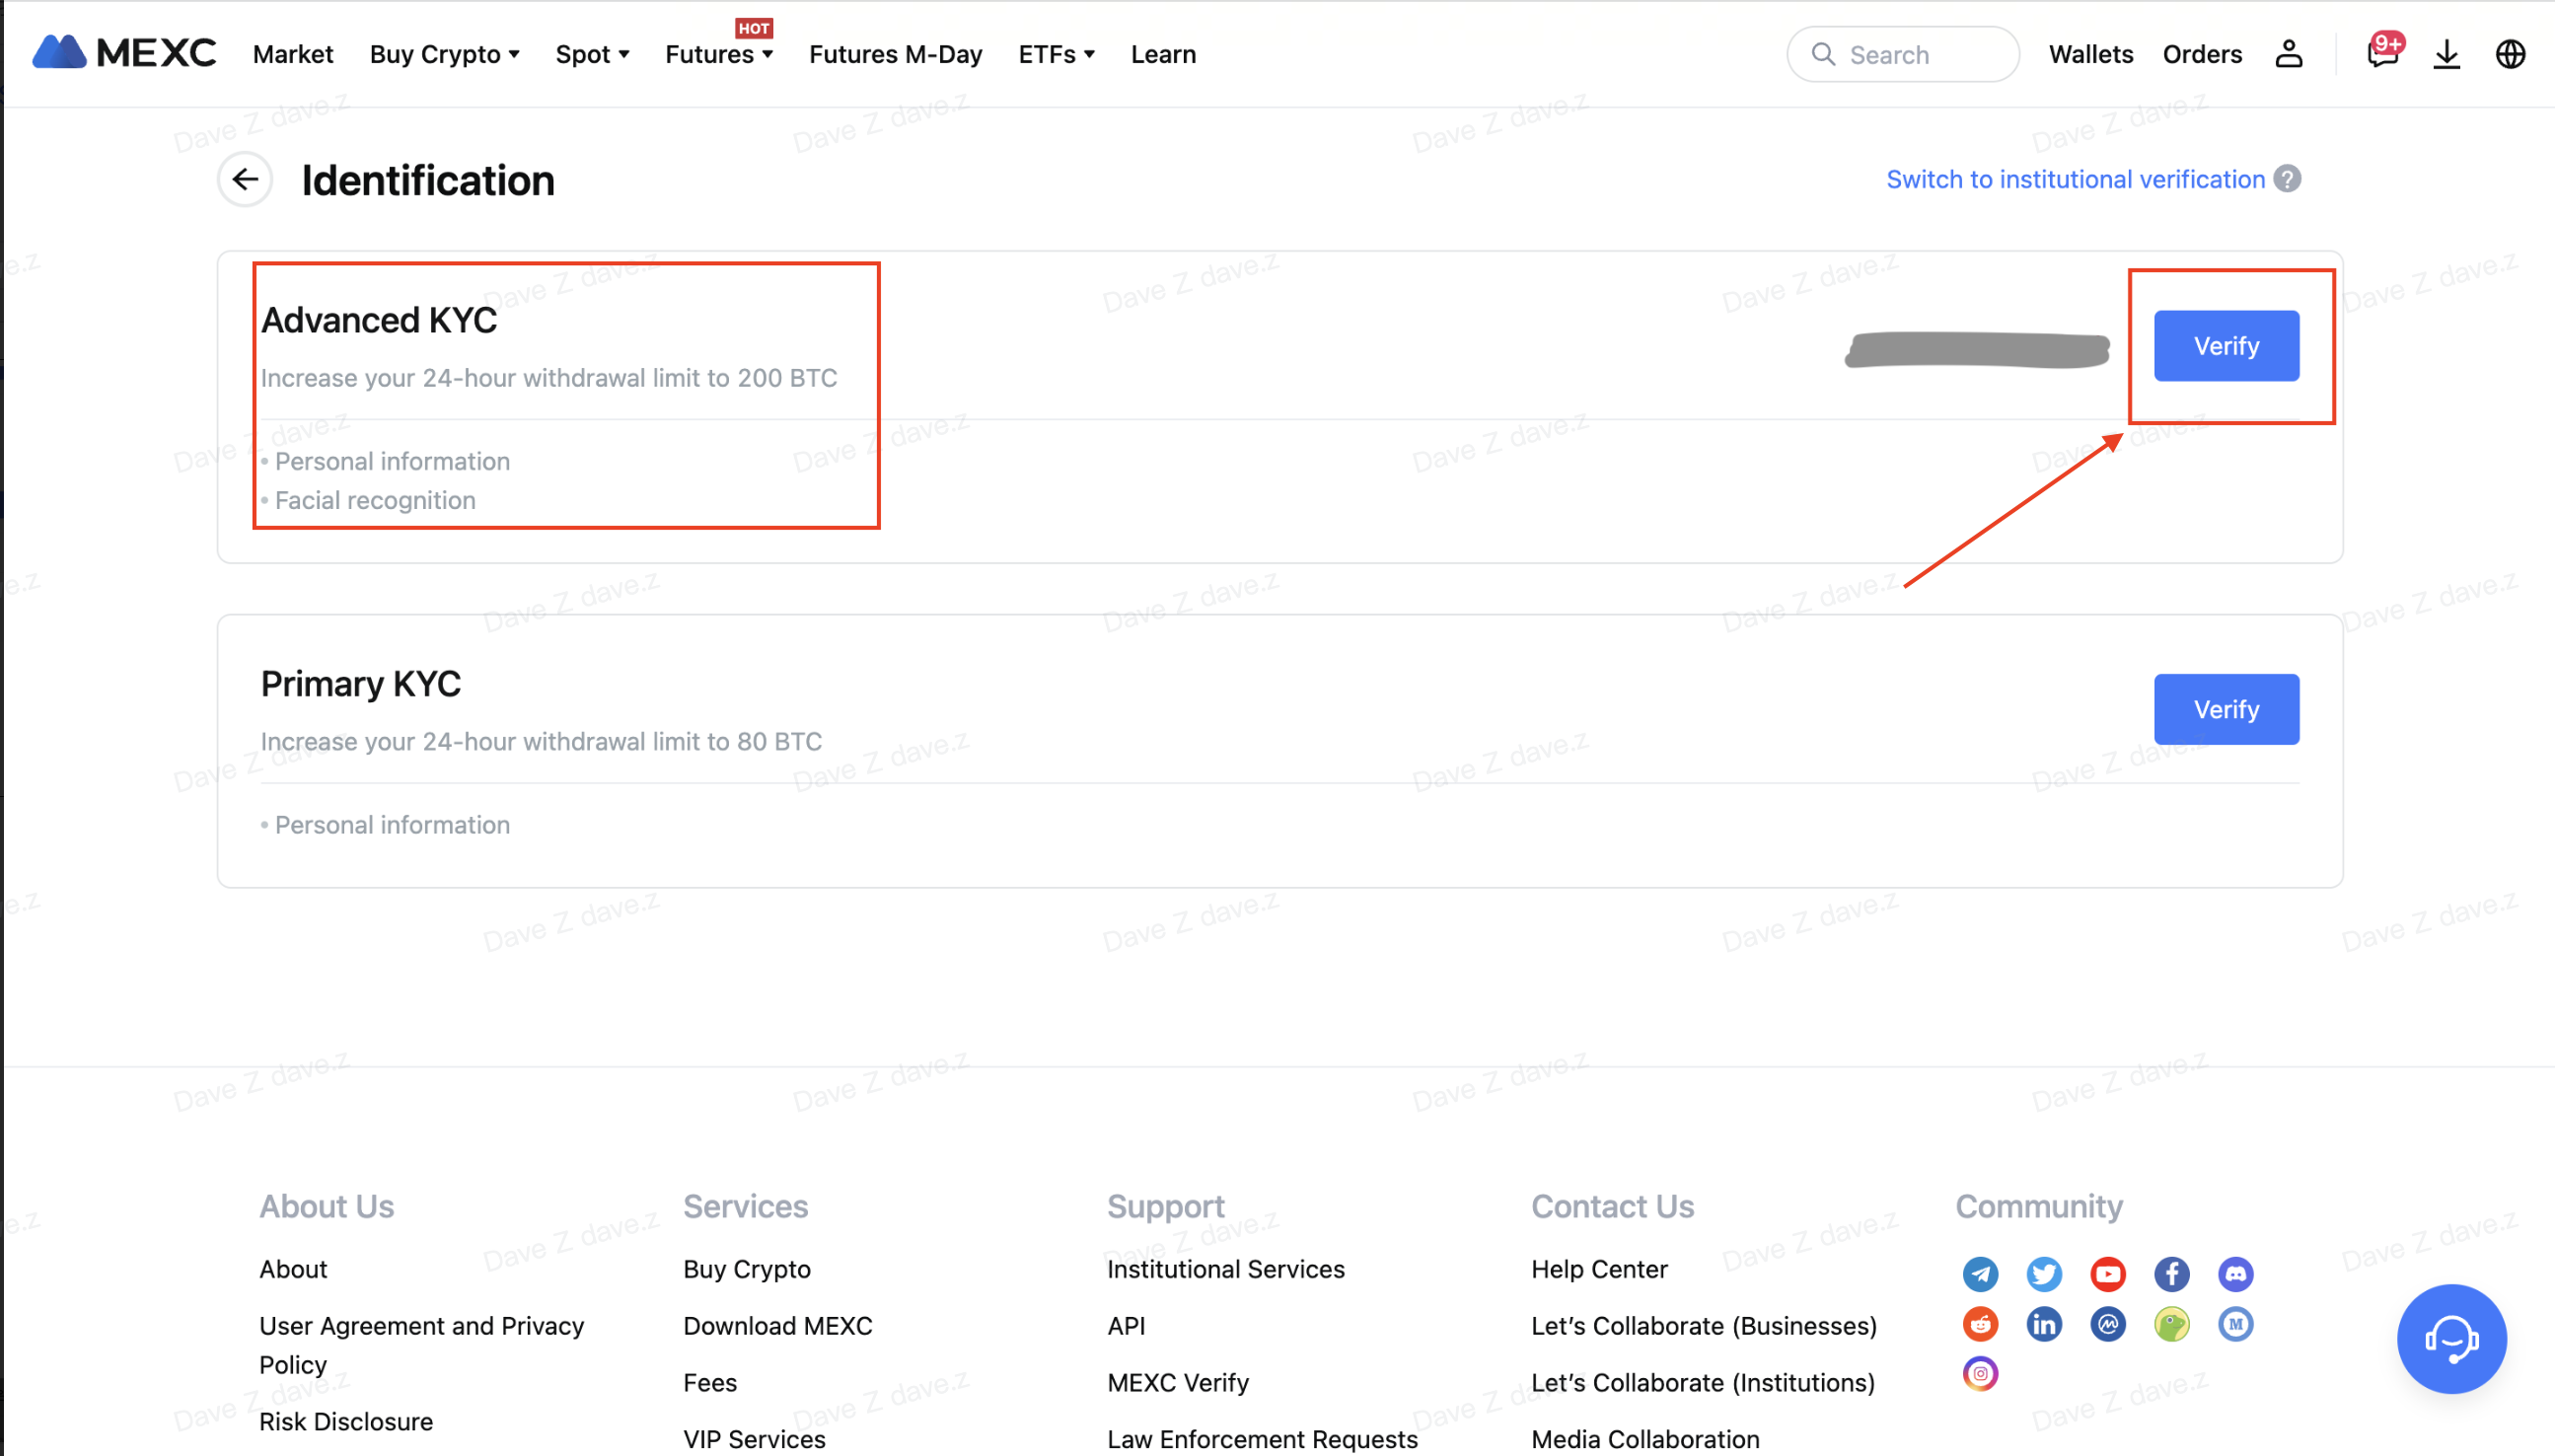
Step 3: Select your Nationality of ID and ID Type.Click on [Confirm].
Please note that:if you have not completed your primary KYC, you will need to select your Nationality of ID and ID Type during advanced KYC. If you have completed your primary KYC,by default, the Nationality of ID you selected during primary KYC will be used, and you will only need to select your ID Type.
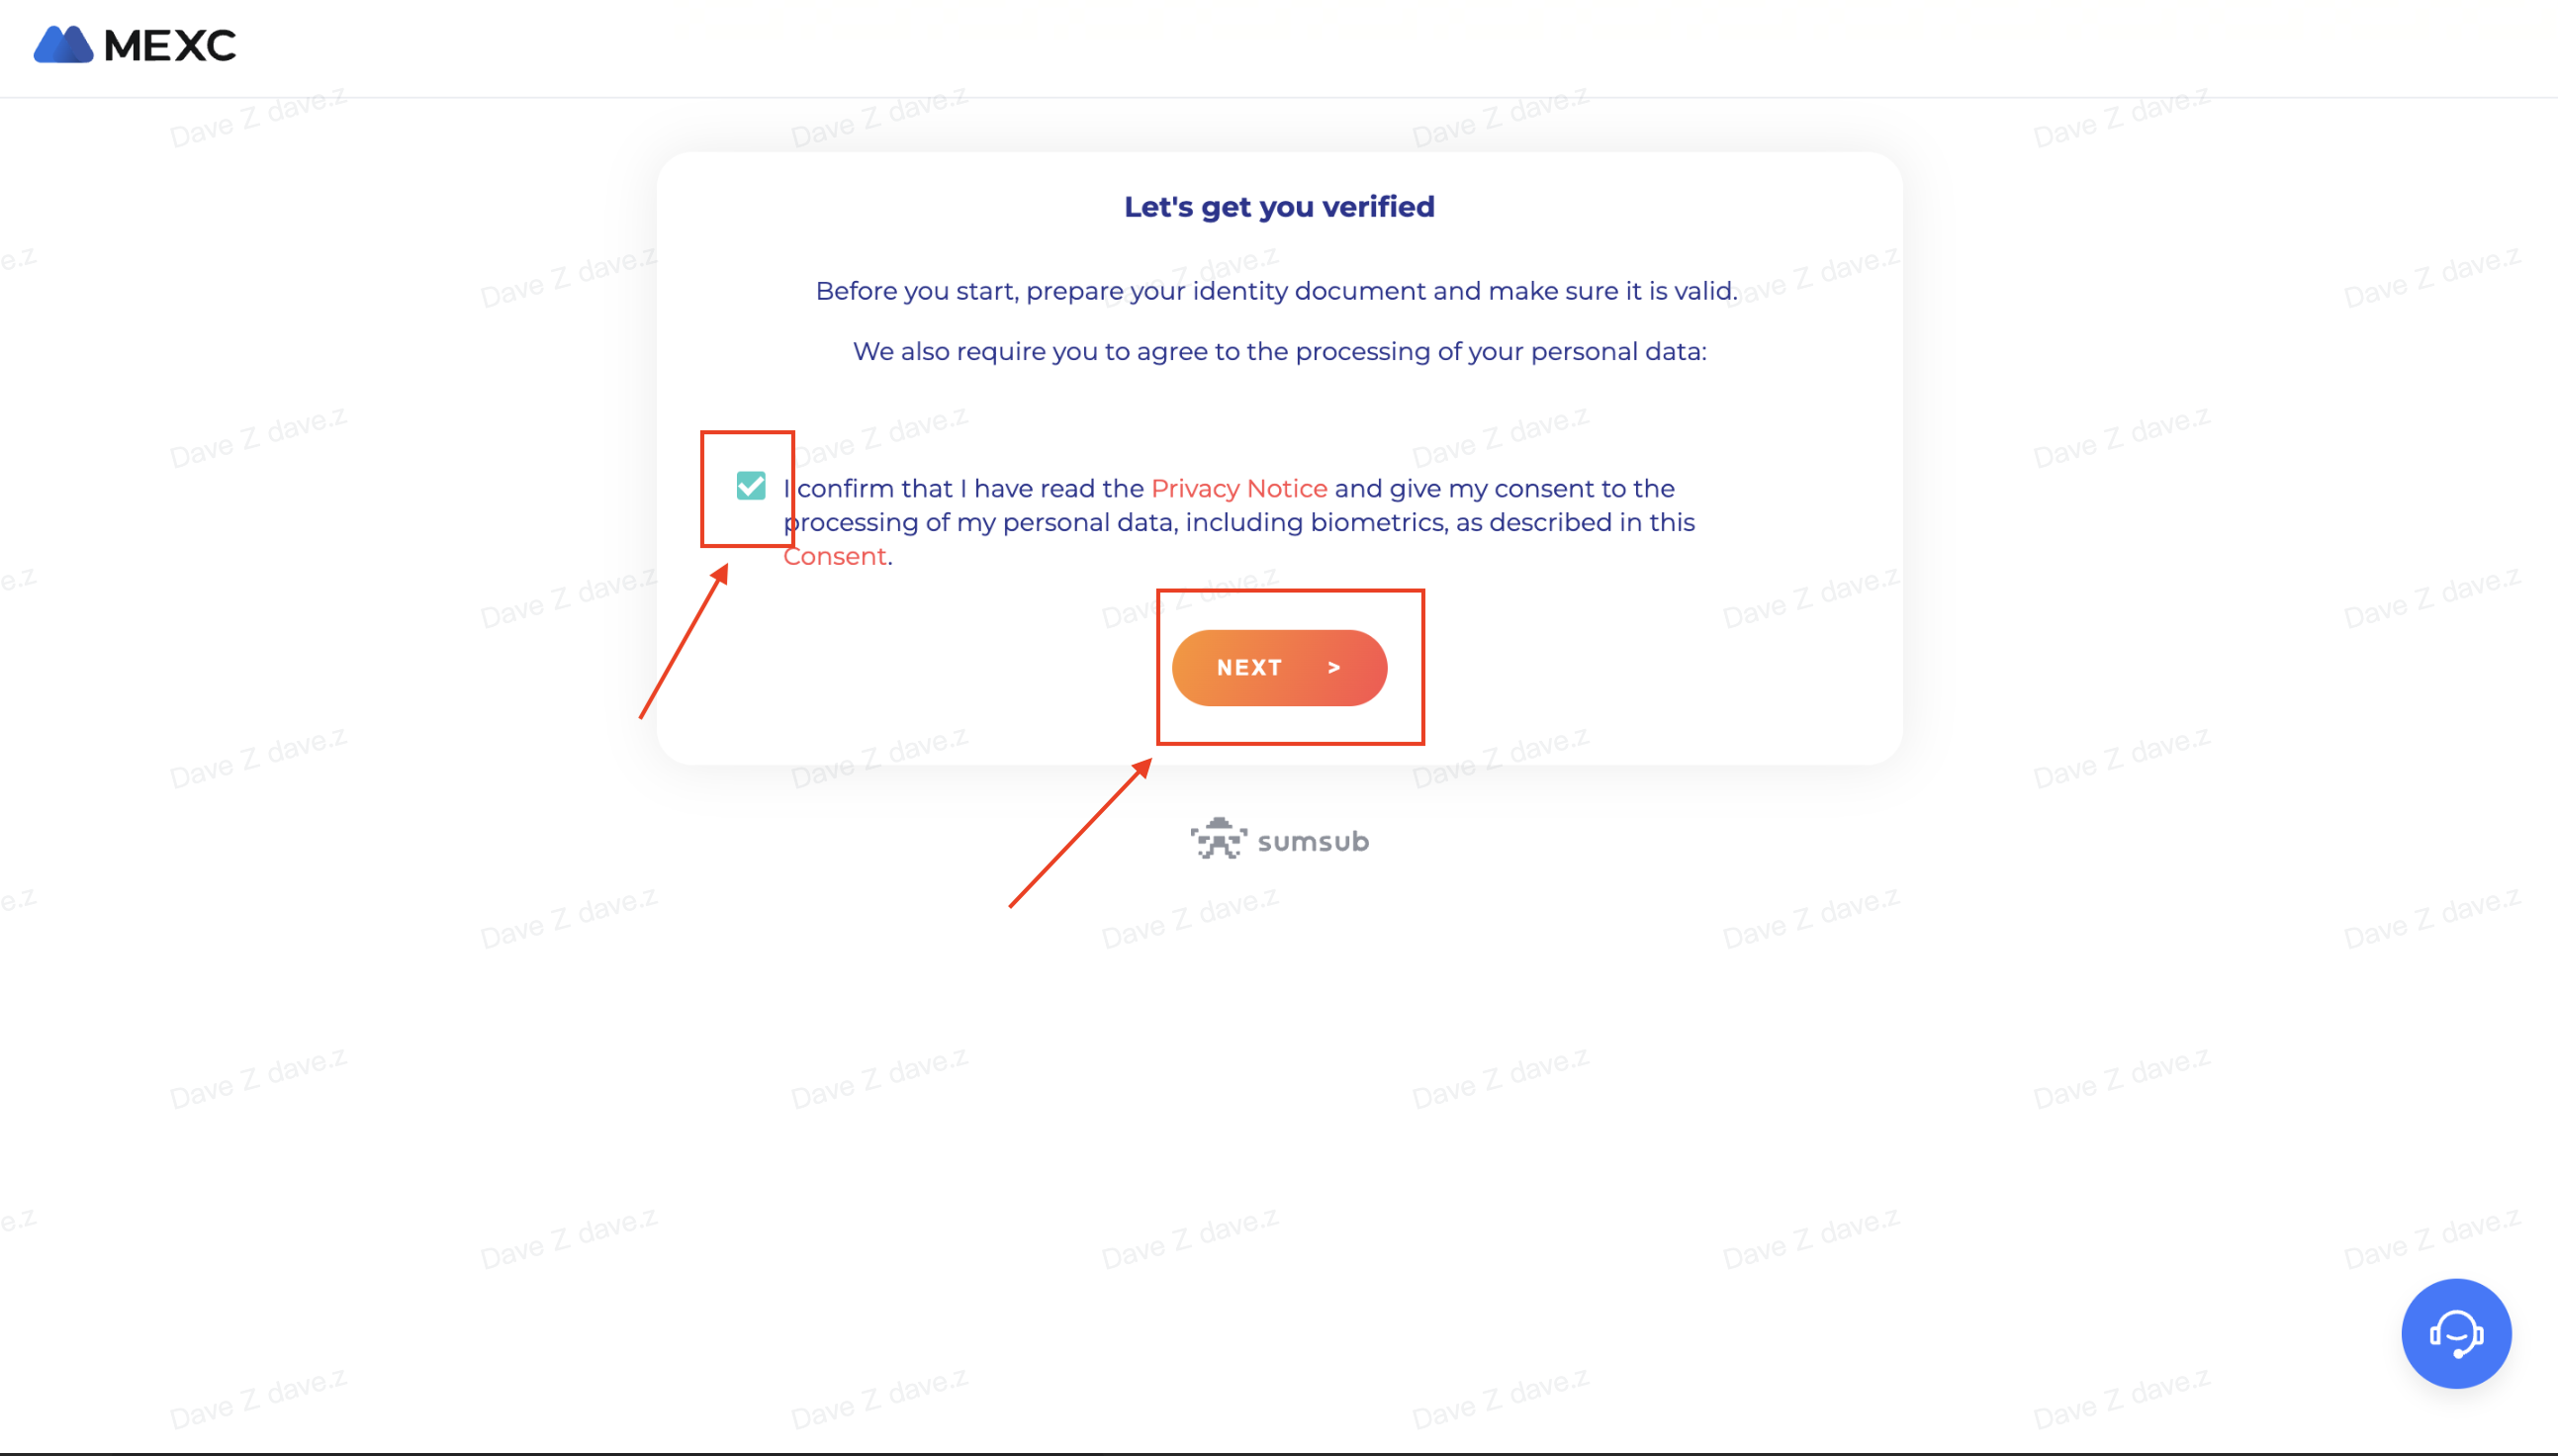
Step 4: Tick the box next to “I confirm that I have read the Privacy Notice and give my consent to the processing of my personal data, including biometrics, as described in this Consent.”Click on [Next].
Step 5: Upload the photos according to the requirements on the webpage.
Please ensure that the document is fully displayed and your face is clear and visible in the photo.
Step 6: After checking that all the information is correct, submit the advanced KYC.
The result will be made available within 48 hours. Please wait patiently.
Step 1: Open your browser and log in to the official MEXC website by clicking on [Log In] in the top right corner. After logging in, click on [Wallets] in the top right corner and select [Spot].
Step 2: Click on [Deposit] on the right-hand side.
Step 3: Select the crypto and the network for the deposit, then click on [Click to generate the address]. Let’s take depositing MX Token using the ERC20 network as an example. Copy the MEXC deposit address and paste it on the withdrawal platform.
Make sure that the network you select matches the one selected on your withdrawal platform. If you select the wrong network, your funds may be lost and they will not be recoverable.
Different networks have different transaction fees. You can select a network with lower fees for your withdrawals.
For certain networks like EOS, you will need to provide a Memo in addition to the address when making deposits. Otherwise, your address cannot be detected.
Let’s use MetaMask wallet as an example to demonstrate how to withdraw MX Token to the MEXC platform.
Step 4: In your MetaMask wallet, select [Send].
Paste the copied deposit address into the withdrawal address field in MetaMask, and make sure to select the same network as your deposit address.
Step 5: Enter the amount you want to withdraw and click on [Next].
Review the withdrawal amount for MX Token, check the current network transaction fee, confirm that all information is correct, and then click on [Confirm] to complete the withdrawal to the MEXC platform. Your funds be deposited into your MEXC account soon.
How to Make a Withdrawal on MEXC?
Step 1: On the official MEXC website, click on [Wallets] on the top right corner, and select [Overview].
Step 2: Click on [Withdraw].
Step 3: Select the crypto you want to withdraw.
Step 4: Fill in the withdrawal address, select the network, and fill in the withdrawal amount. After checking that the details are correct, click on [Submit].
Step 5: Fill in the email verification and Google Authenticator codes, and click on [Submit].
Step 6: Wait for the withdrawal to be completed successfully.
How to make an internal transfer on the website?
Step 1: On the official MEXC website, click on [Wallets] on the top right corner, and select [Overview].
Step 2: Click on [Withdraw].
Step 3: Select the crypto you want to transfer.
Step 4: Select [Transfer to MEXC users]. Currently, you can transfer using an email address, mobile number or UID. Fill in the details of the receiving account.
Step 5: Fill in the corresponding information and the transfer amount. Then, click on [Submit].
Step 6: Fill in the email verification and Google Authenticator codes, and click on [Submit].
Step 7: The transfer will have been completed. Please note internal transfers are currently not available on the app.


 Step 3: Select your Nationality of ID and ID Type.


